Showing posts with label HSTs. Show all posts

Sunday, 14 June 2020

Two finishes: Double Four-patch quilt and HST Doll Quilt


Hi all,
Thank you for reading my blog.  I hope you are all keeping well and occupied during the continuing time of restriction.  It is coming up for three months here in the UK since lockdown was imposed, and though we are starting to get out more there are still difficulties to be faced.  I hope that sewing has been for you, as for me, a way of keeping busy and creative over the past weeks.

The days have passed surprisingly quickly for me, despite only going out once a week to the supermarket.  I have done a lot of gardening, and much cooking for my family who are all WFH.  However I have finally managed to find time to post about two quilts which were actually finished shortly after my last post.  As usual real life got in the way and derailed my blogging good intentions... 

First up is Christopher's quilt:  I just had the binding to handstitch when I blogged about it last (here).  Apologies for the slight colour differences in the photos - the weather has been so wonderfully sunny recently it has been tricky to choose the best time to take pictures, and some have a slightly yellow cast.


Here's the whole quilt hanging on the washing line.  It measures 52" x 64".  The design is a Double Four-patch and I used the leftover large squares for a simple outer border.


The larger squares finish at 3" and the small ones 1 1/2", so the finished blocks measure 6". The 63 blocks are set 7 x 9, light and dark blocks alternating so that chains of small light or dark squares cross the quilt diagonally.


You may be able to see on the closeup above that I tried to emphasise this criss-cross effect of the chains of small squares by the diagonal quilting which, because of the different sizes of squares, is an irregular grid.  This may be more apparent on the back, below.


I was able to make up a scrappy back from a bundle of half metres of soft grey/cream plaid fabrics in my stash, not bought with any particular project in mind but because I loved them. And the binding fabric which is a blue-brown plaid was left over from backing another quilt.  Very satisfying to find and use up fabric when access to quilt shops is impossible.  Plus an excuse to re-stock in due course!


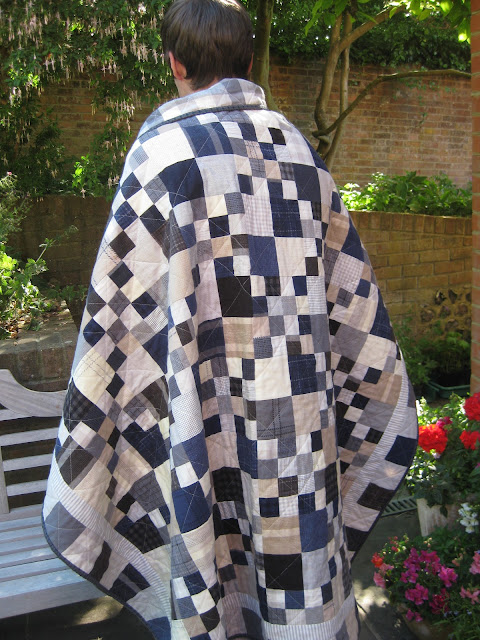
Christopher was very grumpy about modelling his quilt, but less grumpy about taking delivery.  It is soft and snuggly but sufficiently masculine to be acceptable, and I think he enjoyed being involved in the cutting out and subsequent design decisions.  Maybe next time I will get him doing some of the sewing...


You can see the simple cross-hatching in the outer border in the photos above and below.  I left the striped inner border unquilted.


At the same time as I quilted the Double Four-patch I tackled the quilting of a long outstanding WIP.  I decided that, as I was set up on my big machine with the walking foot and cream quilting thread, I should seize the moment and just get on with it.  In the end,  the quilting didn't take very long and, as usual, I kicked myself for having left projects languishing when only a few more hours would have finished them. I hope one day to have truly learned that lesson and be more of a finisher than a starter....


This little quilt dates back to this post here in September 2015!  It is from one of Edyta Sitar's books and you will see from the post that I had decided to use some of the HSTs I had been accumulating.  As you know, I adore piecing, but I always seem to get stuck on the quilting, which is why I have an embarrassing number of tops waiting to become finished quilts.


The quilt measures a smidge under 32" square. There are 144 x 2" (finished size) HSTs set 12 x 12 not counting the 12 blue ones in the centre star.  The floral border measures 4" finished. I made all the HSTs using papers for accuracy: a great way of using up scraps from other projects.  I collected them in a box and when the box was getting full, I made this quilt. My aim is one day to make an enormous HST quilt in the style of the old Dutch quilts which I love.  You can see some modern versions of the sort of thing I mean in the latter part of this post (from a display at Cowslip Workshops in 2017, and no, I haven't finished my Irene Blanck quilt either...).


Originally I had intended to free-motion machine quilt a flowing floral design; in the intervening years since completing the top I have still not learned to FMQ well, so I decided that finished was better than perfect and I would go with straight line quilting in the tradition of utility rather than high art!


Quilting across the HSTs I find easier than stitching in the ditch, and I like the extra texture you get when the quilting thread isn't hidden. And creating a secondary design: can you see the pinwheel framed by the quilting lines?


In the floral border I quilted a simple leaf design with my walking foot.  The curves are very gentle so it was straightforward.  I started with the zigzag line which forms the leaf spines, and then added the curves in a couple of continuous lines, rather than quilting each leaf individually.  This helps to give the process more flow and reduces the number of stops and starts with ends to be tied in.


Binding is from stash, an off-raspberry small floral tone-on-tone: not what I had in mind when I pieced the top but it feels right now.  I love that the decisions involved in making a quilt don't all have to be made at the beginning of the project, but can evolve.  Sometimes I feel a quilt needs to be left in a dark corner to mature: really I think it is me who has to mature, while the quilt waits patiently for me to have acquired the skill or judgment necessary to complete it.


Since finishing these quilts I have been busy stitching my Arlington Square blocks together by hand and chainpiecing on the machine another quilt using a pattern by Emma Mary Designs in a similar bright palette.  But you will have to wait to see those next time.  Meanwhile I hope you make good progress with whatever you are working on.

Monday, 19 March 2018

Thimbleberries Jewel Box II - a February finish


Too late for Finish it up Friday, my usual linkup, but I did have a finish in February which I thought I should show you now, before I get distracted by something else!

I mentioned that I was very good in January about focusing exclusively on quilting: this virtuous resolution carried over into February in that I layered several more tops in readiness, but I only actually managed to quilt one of them.  My excuse is that we had the plumber in, refurbishing our bathroom, which is a different sort of finish for which I cannot take credit.


Yes, it may look familiar to readers of this blog: I made another Jewel Box quilt from old Thimbleberries collections - probably 15-20 years old - and blogged about that one here.  Amazed to see it is almost exactly a year ago.  How serendipitous: I couldn't have told you if you had asked me when it was, so it's great to have this blog as a record.

As I said in the previous post, I had quite a few blocks left over, as one inevitably does, and once again I trawled through all my tucked away stash fabrics, chopping up anything which looked as though it might fit in with the country palette into 5" or 2 1/2" squares.  


This is a great scrapbuster quilt and there are lots of favourite old fabrics so for me it's something of a walk down memory lane.  It's also a great one for clearing out odds and ends of neutrals from other projects as variation in the neutrals adds interest.  As ever with a scrap quilt, the more different fabrics the better, as it is surprisingly hard to get a layout which doesn't repeat the same fabric in too close proximity.  Laying out the blocks satisfactorily always seems to take longer than actually stitching them together!


Don't you think the old patterns are sometimes the best?  Quilts like this one are really easy to live with; undemanding and comfortable, they just fit in with family life.  No-one minds if something gets spilled on them or they drag on the floor.  I guess that's why I keep coming back to this palette of colour and traditional blocks, even though I love the bright fabrics and modern aesthetic too.


At some point during 2017 I must have put the blocks together, and then had a pause till I found a suitable backing fabric in the Cowslip Workshops sale last summer.  I love this backing: it is from Moda's Collection for a Cause 'Nurture' line, and it has just the right country look.  Also the colour was perfect as it gives the quilt a warm and cosy  feeling.  So good to get the perfect fabric at a discount - who doesn't love a bargain without the need to compromise on artistic standards?!


I found enough of an old red Thimbleberries fabric (a useful favourite, also used in other quilts) for the binding.  Job done!  I do love shopping my stash and feeling thrifty: the fact that at some time I had to buy all of the fabric to be able to have a stash to shop is beside the point....


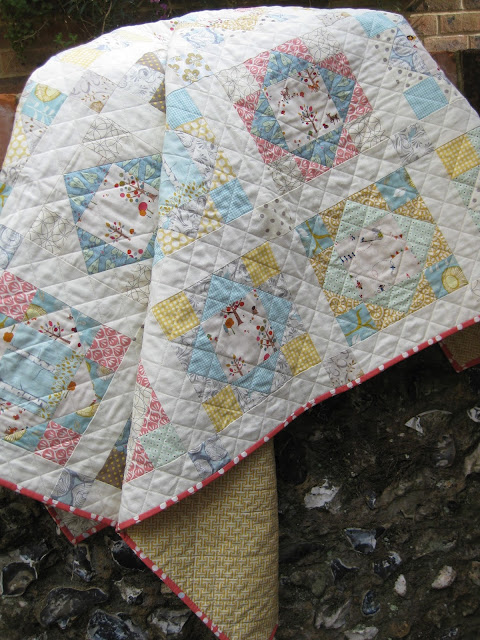
The quilting I did the same as for the first version: crosshatching through the diagonals and then a curving quatrefoil shape in the diamonds.  Easy to do with a walking foot and not too many ends to tie in, especially as this large quilt didn't need a border.


Quilt stats: 80" x 88".  One hundred and ten 8" blocks set 10 x 11.  The blocks are each made up of two 4" HSTs and two 4" four-patches (all measurements are for finished sizes).  I think I have now used up all my made blocks with this quilt, though the few fabric leftovers have gone into the makings of another scrappy quilt which still has some way to go...  Carry on quilting!

Monday, 4 September 2017

September WIP roundup (Part 1)


Happy September to you all and back to school/college/university/work.  I am appalled to see that it is over a month since I blogged - where did August go? I have written lots of posts in my head but totally failed to get down to actually hammering the keyboard to share my sewing activities. Apologies and I promise to try harder this term!

So much has been happening recently that I think I will probably break the posts down in to smaller chunks for easier digestion.  Bear with me while we see how it goes. I think I will work backwards to give my memory a chance to recover!

I have been away a few times this month on sewing related treats so I have come back energised and inspired to tackle some new projects, but especially to finish and clear away some old ones; so this week just past has involved digging out a number of WIPs.

I still have the quilting to do but I have managed to get the following tops together:


In reverse order, this was last night's little treasure, a mini version of a quilt in Edyta Sitar's book Friendship Triangles (it still needs a final pressing). I had the trimmed off triangles from a large Thimbleberries quilt stitched together but screwed up in a bag.  After pressing they looked like this, 


and after trimming to 1 1/2" they looked like this. [Please excuse colour cast from camera flash as I took this photo at night].


I played around with the layout but had always been attracted to Edyta's design, Medallion Quilt which is made with 420 x 2" (finished size) half square triangles; her quilt has quite wide borders and measures 59" square.


My 'quilt' is made with what I had leftover which is 184 x 1" (finished) HSTs plus a few neutral triangles to fill in the gaps and make a straight edge. It measures 15" square.  I debated whether or not to add a border and have decided not to, so it is just waiting to be layered and quilted: hardly a massive job! 

My only other comments are that the trimming was well worth it in terms of getting all the points to match, and as well as my Bloc_loc ruler I gave thanks for my tank steam iron and Best Press spray which flattened out all the seams - so bulky in proportion to such small units. 

Here are the before and after photos for one of the quarter segments.


This next top is a little bigger, measuring 27 1/2" x 31 1/2" and was made from a bundle of offcut triangles and strips from a large quilt I made many years ago, which I am embarrassed to report is lying layered and machine basted upstairs, waiting to be handquilted.


I managed to trim the HSTs to 2 1/2" square and there were enough for thirty 4" (finished) blocks of 4 matching HSTs, set 5 blocks x 6, with 3" wide borders cut from the remaining 2 1/2" strips. I thought this block was called Birds in the Air or Flock of Birds but I haven't so far managed to confirm that: anyone out there know?


Backing and inner border/binding from stash plus a wadding offcut means a small 'free' quilt for someone out of a sad plastic bag of bits. My favourite kind of sewing as I feel thrifty and that I am tidying up at the same time as making a mess!


That's all for now. Hoping to post again tomorrow. Thank you to everyone who drops in to look at this blog from time to time - I met some of you at the Fabric Fayre in Great Bookham the Bank Holiday weekend and it was so good to catch up. Keep on quilting!

Saturday, 29 July 2017

Little and large: two triangle tops


Hi everyone! Summer here in the UK seems to have departed so I can't  get out into the garden, chilly rain reminiscent of November...

Despite a few nevertheless very enjoyable social engagements (including a graduation and a wedding) and the delivery of our new greenhouse to replace the ancient falling-down one, and much coming and going of family members, I have managed to fit in a little light sewing and finished putting together the two HST tops I mentioned in my last post.


So here they are: one made with large HSTs (trimmed to 9 1/2" square), the other made with 1 1/2" HSTs (finishing 1"), hence little and large, though neither top is especially big.


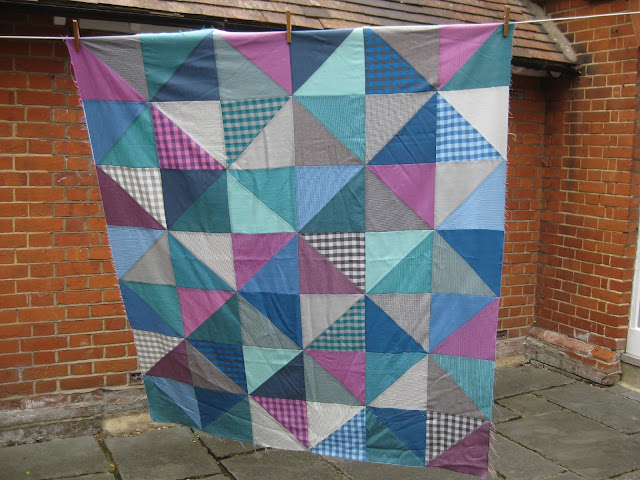
First, the Vast quilt, though not particularly vast, measuring 54" x 64" (please excuse creases, I forgot to iron in my rush to get a photo before it rained again).  The size is determined by the fact that I wanted to use the Layer Cake I already had (Dapper Wovens) and to see how big I could make the quilt with negligible waste.


I really liked the Vast quilt in Jeni Baker's book (here is another version Jeni made and blogged about earlier this year) which was also made by Anna Graham of Noodlehead (see her version here), and I was all fired up to make HSTs because of the talk I was giving on Terrific Triangles.  I got maximum yield from the Layer Cake - 42 layers 10" square yielded 42 HSTs 9 1/2" square.  You can see the scraps in the last blogpost when I had done the squaring up.


Obviously I didn't make the blocks quite as Vast as Jeni, who used fat quarters: her blocks finished at 17" square. But I am happy with my version for now.  Also Jeni had amazing long arm quilting on her quilt for the book, which I could never hope to emulate, but can certainly admire.


I am currently pondering over the quilting of my finished quilt top. I love Anna Graham's straight line
quilting but the Woven fabrics are very soft and I think they would distort if over quilted. I may just quilt in the ditch to start with and then possibly add some handquilting, with perle thread maybe? Any thoughts? I absolutely love the colours of the Wovens and this is a quilt I don't expect to part with so it would be worth adding some embellishment...

The other top is also inspired by a recent book I really like: it's a variation of the Remainders quilt in Amanda Jean Nyberg's book, No Scrap Left Behind, which I mentioned last post. 


My scraps were bonus HSTs left over from the flying geese units of a quilt I made with a starter bundle of Blend fabrics from the Eternal Maker in Chichester.  Completely out of my colour comfort zone but I was drawn to them and made this quilt which featured in a magazine and which has now gone to a new home.


The colours were so similar to the scraps Amanda Jean had used that I decided it was meant to be, though I modified the method and sashed the tiny HST units in the normal way, using just one plain fabric rather than scraps.

Having trimmed all the leftover HSTs to 1 1/2" which is where you left me two weeks ago, I counted up 288 HSTs and started to join them into strips with Kona Snow (from stash) plain fabric rectangles measuring 1 1/2" x 2". But part way through the process I felt that I didn't have enough HSTs for a reasonably sized quilt.  Funny how many there seemed to be when I had a never-ending pile to be trimmed, but they don't go far when laid out for a top (unlike Vast!).

Anyway I had a bit of fabric left from the original project and I pulled out a couple more aquas and yellows and neutrals to add variety.  Because I didn't want to have to do any more trimming, and because I had been demo-ing triangle papers, I decided to make the remaining HSTs using Thangles.


I had 1 1/2" firmly in my head from all the trimming - and so I made all my additional HSTs using 1 1/2" Thangle paper - making the cardinal error (despite re-reading the paperwork several times) of forgetting that 1 1/2" is the FINISHED size of the Thangle whereas I would be wanting my HSTs to measure 1 1/2" UNfinished....


So I stitched


and pressed


and removed papers


only to find I had a lovely pile of accurate 2" HSTs..... which I then had to trim down to 1 1/2" so they would match the others. Quilter's hubris. Did I mention there had been a lot going on?


Never mind, all's mostly well that ends well. And I had only made an extra 180 HSTs to be able to set 26 rows of 18 'blocks', sashed with strips which ended up 1 1/2" finished, just slightly larger than the 1" finished HSTs.


But while we are being honest, I have to confess also that in my eagerness to get this top together I did what I would tell my classes never to do: I did not measure and cut all my horizontal sashing strips to the same length, just as for borders, and did not pin but just whacked the strips on regardless. The result is that, although the top is reasonably flat, the lines of HSTs do not line up perfectly as vertical rows. It is not very easy to see in the photos but when you put a ruler over the top it is definitely out of true.

I did measure and add my outer 3" borders 'properly' so the quilt is a reliable rectangle measuring 52" x 70", but I can't straight line quilt it as the lines would be too obviously out. I definitely need to get practising free motion quilting so I can loopy quilt this one!


My only other gripe is that I find plain fabrics/solids fray far more than printed fabrics so I am going to have to spend quite a bit of time tidying up stray threads on the back before quilting. Any of you agree this is annoying?

But that's a small complaint really: I am delighted that that forlorn plastic bag of bits and leftover fabric from an old project have been made useful and given a purpose in this new quilt top.  So I am linking to Finish it up Friday with Crazy Mom Quilts, and my thanks once again to Amanda Jean for her continuing inspiration to those of us who, like her, love our scraps!