Wednesday, 22 April 2015

Lozenge layered

Forgot to post the photo of actual Spring flowers last time so here they are: early dog violets in all their modest beauty.


There is not much depth of field with my little automatic camera so please forgive the less than professional shot, I just wanted to capture the intense purple and green, not colours I tend to choose for my patchwork, but so lovely in nature.

On the sewing front, I have almost finished my second batch of small taupe circles for my Quartet BOM, but I thought I would show you the Lozenge EPP top which I finished putting together recently.  Here it is all layered up ready for handquilting.


I started the quilting today so it is my WIP for today's WIP Wednesday with Lee at Freshly Pieced. This little quilt will be a WIP for some time as I am pretty slow at hand quilting.  And EPP for that matter - this has been my take-along project for quite a while.


I am off to Nantes on Friday for the quilt show organised by Quiltmania, Pour l'Amour du Fil.  I will be away all weekend with two quilting friends - what a treat!  Hope to show you some photos next week.  Till then, enjoy your quilting.

Friday, 17 April 2015

Spring flowers

My finish today is the Disappearing Hourglass which I started here and continued here: a flowery quilt for the spring flowers and blossom we are enjoying at present.  It is not quilted but the blocks are all made and the top is together.  As I have to go shopping for a backing, that's as much of a finish on this project as I can manage for the time being.


The top ended up measuring 42" x 56", that's 48 seven-inch blocks set 6 x 8.  As I write this I think I might just add a narrow white border to float the blocks and give the eye a place to rest before the binding.  But I'm counting it as a finish all the same!


Lots of gardening at the moment, the plants are growing almost visibly in the glorious warm sunshine.  So quilting is taking a bit of a back seat.  Here is a glimpse of some of my ongoing projects though: I hope you will see them come to a finish in the next few weeks.


I'm linking today to Crazy Mom Quilts: Finish it up Friday.  Hope you all have a great weekend!

Friday, 10 April 2015

Friday finishes x 2

Yes, I have TWO finishes today - amazing, feels so good, as both have history.  It is great to get them completed.  I especially enjoyed handstitching the bindings, that final stage when you can take time to enjoy the process of completing.  It is almost sad when you get to the last stitch, as it's farewell to that quilt and on with the next!

So here we have the Flannel Square in a Square quilt with Flying Geese borders which was stitched on to Foundation-by-the-Yard.

All from stash, using up some flannels which must be at least 10 years old, ditto the foundation. Started here, so quite a quick turnaround for me.  It ended up being a fairly easy little project and I didn't agonise too much over which fabric went where - more a case of how big the pieces were and would I have enough...


Anyway I did have enough, and I even had a piece large enough for the backing (with a strip of green pieced in), and I also found I had enough large patches in a pink/tan/navy palette to make another small quilt top (41" x 52") in half-square triangles (5 1/2" block).


This one isn't finished as I don't have a backing, so it will have to wait a while longer.

The completed Square in Square quilt was small enough (33" x 41") for me to quilt in the ditch around the shapes, as it did involve a fair amount of turning.  However there's not much point doing fancy quilting on flannel as the thread sinks without trace, and a grid of any kind I thought would be a bit heavy.


The ditch stitching looks quite nice on the back as it echoes the geometry of the front. Lovely sludgy greeny gold Aurifil thread matched the backing perfectly, and I used a green Mettler thread I had in my box for the front.

Even the wadding was from scrap - so a totally stash project: hurray!

The flannel scraps that are left (remarkably there still seem to be quite a few) will be donated elsewhere - I am done with them.  Such a good feeling.


Second finish is the Remembrance quilt I last blogged about here.  Yes, I know that is quite a while ago.


I messed up the quilting and it puckered horribly - I was trying for too close a grid and I think the 80:20 wadding was just too lofty to lie flat and submit.  It has taken me till now to unpick it all, as I had done rather too much before getting the message to start again.  Also the thread colour was such a great match that I could only unpick in good daylight, which has been in short supply this winter.


Once the old stitching was out I found that I actually did not have to re-layer, a slightly surprising but happy discovery.  Less dense quilting was the answer: I ditch-quilted the verticals between the nine-patches and then went across the diagonals of the hourglass blocks and nine-patches.  It's enough, I think.


(In the photo above you can still see the Hera marked crease lines of the original grid - time to put the quilt in the washing machine...).  


So, after all the delay and despondency I am happy with the finish.  

The quilt measures 48" x 59", a good lap size, and it was made with the leftover fabric from the Album quilt I showed you here.  Backing stripe from stash with a bit of green textured solid pieced in.  Another scrap/stash project done: double hurray!


I hope you are able to press on with your projects this weekend, and maybe even enjoy a finish or two?

Linking today to Crazy Mom Quilts: Finish it up Friday - it's lovely to have Amanda Jean back blogging again.  Have a look at her gorgeous Birch Trees quilt.

Wednesday, 8 April 2015

WIP Wednesday - Quartet BOM progress

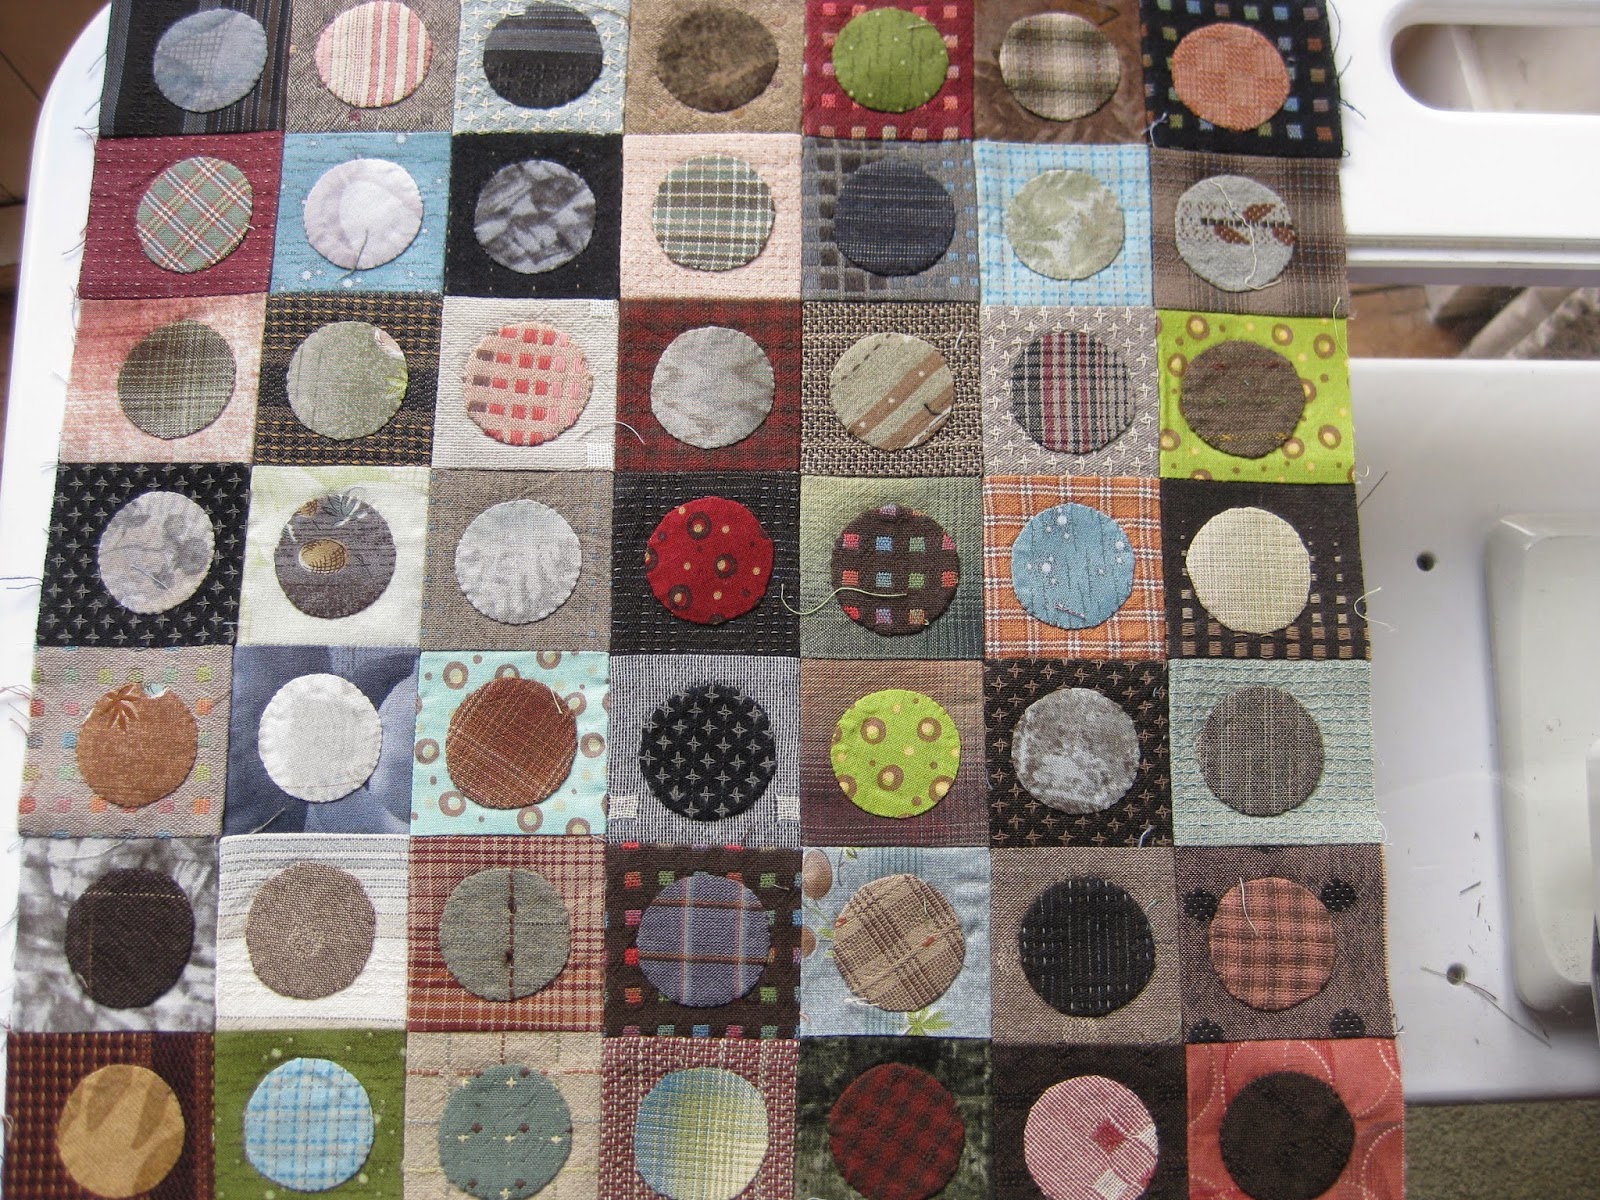
Quartet BOM:  I have managed to finish my first circles block!  Despite my avowed dislike of applique I really got into it with this project.


I have even started on prep for the second circles block: only 49 more tiny treasures to stitch...


Sorry about the threads - rushed to get these photos and didn't check the detail..


I also joined both the Log Cabin blocks, having spent the usual ridiculous amount of time agonising over the layouts...  Mind you, it is a lot easier to shuffle around 49 blocks which only measure 2 3/8" each and can fit on a tea tray, than 49 regular 6" or 8" blocks which need a design wall or most of the floor for laying out.


You will see that the first set of blocks (above) has a more random use of fabric whereas the second Log Cabin variation (below, at the layout stage) has the same fabric for each complete round of logs. Basically I got the wrong end of the stick with the first set, but I am making a virtue of it...  My BOM will be unique.


Linking to Lee at Freshly Pieced WIP Wednesday.

Wednesday, 25 March 2015

In circles

As in, running around in circles...  Teaching, entertaining, cooking and tidying up.  Hospital appointments for my mother-in-law.  All the stuff that leaves you with nothing to show for how you have spent your day, but nonetheless necessary.

Not much sewing done, so all I can show you is a little hand applique of the circles block for my Quartet BOM (and also here).  I am no great shakes at applique so have been putting this off for a while; however, now that I have actually started, I am getting into the swing of it.


I am using YLI silk thread in either soft grey or light brown because one or the other colour blends with most of the taupe shades, and the very fine thread means my not-very-neat stitches melt into the fabric.


Hope to be more productive next week.  Meanwhile, here's a lovely colour study of Helleborus lividus, all dusky pinky and creamy yellow with beautiful marbled leaves.  Spring is definitely on the way...


Linking to Lee at Freshly Pieced: WIP Wednesday.  Love her studio.

Friday, 20 March 2015

Disappearing Hourglass and more...

Quick post this week as I am teaching tomorrow (String Quilts, my favourite, at my LQS) and we have friends visiting on Sunday, so lots of non-sewing things to do.

I have made almost all of my Disappearing Hourglass blocks: here are a few laid out on my small design board.  This number of blocks would be about the right size for a cot quilt, but I want something a little bigger.


Slightly to my surprise, I must confess, the piecing went really well, with nice sharp points.  I have always been a little suspicious of the various 'disappearing block' methods as I think they can give rather inaccurate results, but  (admittedly with careful cutting) these were a delight.  In fact the only block which went awry was one where the ruler slipped as I was cutting.


Spring cleaning turned up a box of ancient flannel fabrics (OK, not all that ancient, but distinctly out of fashion nowadays).  I also found some Foundation by the Yard and decided to make another quilt by this method and use up them up.


I made a small Christmas quilt years ago in just greens and tans with a smidgeon of red, but this time I will be using up all the rest of the colours in the box as well, mostly blue and brown.  It is likely to still be rather Christmassy: hard to escape that look with these shades of red and green, plus the snowflakes, of course....


Final WIP, just a glimpse, is the wedding quilt I have been working on for the lovely daughter of a dear friend.  I have almost finished the blocks and will be having fun soon with the layout.  This will be a cozy quilt for the newly weds this autumn, I hope.


So next week looks like it might be busy...  I have to make hay while the sun doesn't shine, as the garden will be taking all my time soon.  It is a cold, wet Spring here so far and I won't start gardening properly till the weather is more reliable, but it won't be long now: my machine needs to work overtime to get these projects more or less done before then.  Will keep you posted.

Friday, 13 March 2015

Spring cleaning the Chandelier

What does spring cleaning mean to you?  Pail of soapy water and a scrubbing brush?  No, me neither. For me it means pulling everything out of the sewing cupboard and finding projects which are almost but not quite completed, then completing them.  I feel so virtuous that I am then justified (in my mind anyway) in starting something new...

We don't have a chandelier, but I have now finished my quilt from the Chandelier Quilt-along which Lee of Freshly Pieced ran on the Bernina We all Sew blog (here).  I blogged about this here and ground to a halt while waiting for more background fabric, then Christmas etc happened.


So, encouraged by finishing my Scrappy Trip last week, I plunged on and finished the piecing AND quilting at a run: simple straight line quilting with the walking foot, lines about 1/2" apart.
I like the ribbed texture.


These are my tips if you are tackling a biggish project with straight lines if, like me, you don't have a guide to attach to your machine foot to keep the spacing accurate.

  • Mark lines parallel to the vertical seams.  I used a Hera marker which shows up fine on light coloured fabric - you may need to experiment of you have darker or busier fabric.
  • Don't mark every line.  I chose to mark lines 1" apart.  I quilted these and then went back and added the lines in between by eye.  They are not absolutely straight but I am a person, not a robot, and I think it adds interest to have a bit of wobble here and there.
  • Most important tip is to start all of the quilting lines at the top of the piece - do not reverse the direction of travel.  If you do you will get puckers as the fabric is pushed first one way and then the other.  I start in the middle of the quilt's top edge and then work out towards the right hand side ie the amount of fabric under the machine arm will reduce with each quilting row. Then I'm afraid you will have more of a battle as you work from the middle out towards the left hand side of the quilt, so there will be more fabric scrunched under the arm with each row quilted.

This quilt is a smidge under 60" square and it is do-able; I'm not sure about rib-quilting a really massive quilt, I'll let you know when I've done one.  Just resist the temptation to turn and work up from the bottom if you possibly can, it's worth it.

The soft grey speckle fabric on the back was a curtain remnant (Stippleglaze from Osborne & Little) which I must have picked up somewhere, but it is very lightweight cotton so fine for quilting. Scrappy binding to pull all the colours together.


So what did I start?  In the course of my spring clean I pulled out some charm squares bought on impulse at a show a couple of years ago - Wildflower by Kathy Davis for Free Spirit the selvage says - and just waiting for the right pattern to inspire me.

I thought about the Broken Dishes block in a star setting which I have seen on Pinterest and loved, but the 5" squares made an 8 1/2" block which would make a 16 1/2" star block - a bit clunky I felt.

What to do?  Ran through various possibilities in my head, nothing clicked. Then I remembered the Missouri Star Quilt Company had a Disappearing Hourglass tutorial.  Now I don't call this block the Hourglass block; to me the Hourglass is a square quartered diagonally, ie the centre portion only of the block shown above, but leaving the name aside, we were talking about the same block.


And this is the result.  Aren't they adorable little blocks - mine are smaller than the MSQC ones, being made from 5" squares rather than a 10" Layer Cake: mine finish at 7".  I am thrilled - I think the fabrics work well and are fresh against the white tone-on-tone (it has a swirly vine which you probably cannot see - barely there but not an actual solid, also from stash).

Couple of comments on the tutorial, which is lovely and full of Jenny Doan's usual enthusiasm.  I have a personal issue with the method Jenny uses to make her HST's: I think it is not helpful to have all those bias edges on the outside of the HST's as the stretchiness may distort the block.

I made my HST's by the time-honoured method of drawing a diagonal line corner to corner and stitching 1/4" either side, then cutting and trimming to 4 1/2" with my Bloc_loc square ruler.

I would also recommend pressing some of the main seams open to help flatten the block; this really helps when you come to cut up the Hourglass block as the ruler is less likely to slip.  Best Press is my best friend here.


They will look even better when they are joined up - next week, I hope.  Tune in then!