Friday, 31 March 2017

Taupe Flying Geese - a finished quilt


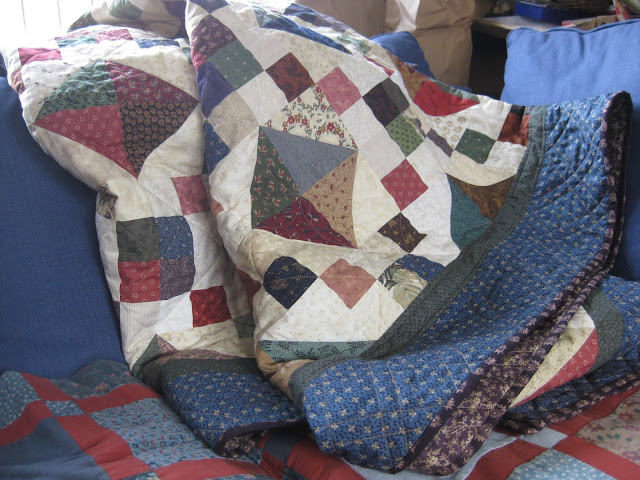
I have a finish to share with you all today: not the one I intended as I find I haven't taken any photos of that quilt, so that will be tomorrow's task. However here is another finished quilt from a few weeks ago - you can tell by the grey sky and leafless tree that I photographed it at the beginning of the month.


I actually cannot remember when I pieced this small quilt, though I would guess it is at least 10 years ago. It was one of the first things I made with the new Daiwabo taupe fabrics which were then just becoming available in the UK.


I like to think that my piecing would be more precise if I were to make the quilt again today, so please be kind if you spot any faults. I love flying geese, but I would always now make them oversized and trim with a Bloc_loc ruler to ensure perfect points. However if you squint at the quilt from a distance I guess it's not too bad...


I still really like the fabrics (which is just as well as I still seem to have oodles of taupes left in my stash). There is something about the Japanese taupes, that almost but not quite monochrome quality, which actually makes you really look at the fabrics and see the subtle colours that were there all the time, but which you overlook at first.


I had originally intended to handquilt this one - I would handquilt everything if I could but in practice I handquilt almost nothing - so the quilt has hung around for years, layered and tacked (basted) together.  I kept moving it, intending to make a start but never quite getting round to it, and the quilt was therefore rather grubby in places. 

I had chosen a plain calico (muslin) backing to show off the hand quilting (my intention was that it would look a bit like a wholecloth quilt on the reverse) and when I re-layered with basting spray after removing the tacking, I stuck with the original plan.

I am really pleased with the quilting, and it just shows what can be achieved with a walking foot and a bit of quilt wrangling. In case you are interested in having a go on your next flying geese quilt, I will describe how I went about it.


I put in the structural quilting lines first, the verticals on either side of the geese strips, burying my thread 'tails' at the top and bottom. Next I stitched down the right hand side of one of the strips of geese in a zigzag, working from the point down the sloping side of the goose triangle, turned the quilt and then worked along the bottom of the triangle towards the mid point, when I turned and went down the slope of the next goose triangle. 

Continuing all the way down the strip, I decided not to risk turning the whole quilt and working up the strip in the opposite direction - I felt that would probably create puckers and the quilt would not hang properly.  So I finished there and started again at the top of the strip, this time travelling down the left hand side oft the strip of geese and meeting my first line of stitching at the tip/midpoint each time to complete the outlining of the goose triangle.


Once I had done all the strips of geese in this manner and buried all the thread ends, I finished by putting parallel vertical and horizontal lines in the sashing and borders, guided by the woven design of the fabric.

I hope that is comprehensible - if I had any IT skills I could draw the line on to the photo and you would understand instantly, but I don't....sorry! It is not quite as awful a task as it might sound to machine quilt in this way as this is a fairly small quilt (54" x 65") and reasonably easy to turn. I feel it was worth the effort for the amazing texture on the reverse, which does remind me of a wholecloth quilt even if it isn't handquilted!


I am ending this post with two photographs of the quilt taken today, the last day of March and almost a month since the first picture. A beautiful Spring day with the plum tree in blossom. Lots of gardening to do this weekend so quilting will have to take a back seat.


I hope you have a wonderful weekend, however you choose to spend it.  Linking to Crazy Mom Quilts for Finish it up Friday.


Friday, 17 March 2017

Finish it up Friday - Zen quilts


Hello everyone, I am posting two finished quilts today as part of a continuing roundup of WIPs which I have managed to quilt and finish since the beginning of the year. I have nearly caught up with posting, but not with finishing all my WIPs, though progress has been made!

This has come about because I decided in November that I really should prioritise finishing some tops I have had languishing for far too long: they won't quilt themselves after all! So I have tried to be good and not to start too many new projects recently - but it is so hard: sometimes my brain feels like it is bursting to make three more quilts for every one I manage to finish: do you ever feel like that?


This pair of quilts are made mostly from a range by Makower called Zen which was around probably ten years ago.  When they surfaced during a big sort out, I found that I had pieced the large quilt and that I had allocated a brown floral fabric as a backing.


After measuring I realised I couldn't add a border as the backing would not then be large enough, so I decided  on a quilt without borders -  it is 72" square or thereabouts - and that I would quilt diagonals across every square but in alternate directions so the quilting would not be too dense and stiff. The binding is a pink tone-on-tone which also appears in the quilt.

I'm sure you will be familiar with the quilt's pattern: it is Scrappy Trips around the World by Bonnie Hunter (tutorial here), a design I have made before and love. I am a big fan of her super-speedy methods for making big quilts which use lots of fabrics.  Here the strips are 2 1/2" so the blocks finish at 12".


However I still had quite a few strips left over, as the strip set method yields enough for two blocks and a few extra strips over and above: you know how I hate not using every scrap, especially when already part-pieced, so I resolved to make a second quilt with the leftovers.

I decided therefore to make a super scrappy Bargello - also a Bonnie Hunter design (tutorial here), which I have made before and also love.  I added in a few extra strips which bulked out some of the shortfall, and then spent ages shuffling the blocks around until I got a design which more or less worked without repetition.


So here is the finished Scrappy Bargello quilt which measures 48" square. Not quite such a useful size but it would look good draped on a chair to accessorise with the larger bed quilt.


I found a large floral fabric in my stash which picked out the soft greens, browns and pinks, (I used a little of this fabric in the blocks too) and a green print this time for the binding, so the quilts are twins but not identical .


I am pleased to have completed this pair of quilts and to have made something useful and useable from the bag at the back of the cupboard. Indulge me in a few more photos, and then go and admire Amanda Jean's lovely finish at Crazy Mom Quilts today.


Have a great weekend, whatever you are working on.


Wednesday, 15 March 2017

WIP Wednesday - mini QAL


Hi all, and can I just thank everyone who has taken the trouble to visit my blog over the past few weeks, now that I have actually got back into posting more often. I really appreciate it, even more if you have been kind enough to leave a comment. It is so nice to feel connected to other quilters out there.

This week I am plugging away with quilting another old-ish WIP which had reached the finished top stage some time ago. I am in the zone now, and quite enjoy having the Juki set up with walking foot and putting in the lines of quilting, it doesn't need too much in the way of thought, once a decision has been made just how the top will be quilted. The bit I'm not so keen on is the layering... 

In between though, I have been working on something new: I mentioned the two young women I have been teaching to sew over the past few months and our excursion to purchase fabric for their first quilts (towards the end of this post). Well, I decided that I should quilt along with them, and try and keep one jump ahead, just to troubleshoot any problems you understand, but really because I wanted to join in the fun.


So here is what I have been doing. Needless to say, I couldn't really justify buying a new layer cake when I have so much fabric stashed, so my challenge was to use the pinks and greens I had set aside for another project (can't now remember what) some considerable time ago. There are quite a few fabrics from an early collection by Tanya Whelan, Grand Revival, plus others from the stash which I thought might work too.


Pinks and greens are not really my usual choice but I must have liked the fabric or I wouldn't have bought it, and it's good to challenge oneself now and then. Certainly the palette is very fresh and Spring-like, so it feels right for today when the sun is shining and the buds are about to break into leaf.


You will also see that I have made a small mountain of blocks, partly because, as usual, I purchased far more fabric than needed, and partly because I must have always intended to make a large quilt, having bought 5 metres of the lovely green and white floral fabric from the range...


I hope to show you my students' fabric choices next week when they have got a few more of their blocks together, but for now, if you'd like to have a look at the pattern we are using, it is Squares and Strips Bed Quilt by Allison Harris of Cluck Cluck Sew and here is the link to the free tutorial.


The blocks are quick and easy to make and it is a great quilt for a beginner. I modified the cutting so we could use Layer Cakes to avoid waste and yet provide a good variety of prints for relatively little outlay.  I will show you that next week if you are interested, plus some of the girls' blocks if they will let me!


Hope you make progress on your current WIP this week!

Friday, 10 March 2017

Friday - Finished up Leftovers

Another week gone and I have a finish to share.  


This little quilt expresses all I love best about patchwork and quilting.  It is made with the nine- patches and fabrics I had left over from making the Wedding Stars quilt (see this post), a quilt I loved making for two special young people, so my leftover quilt will always have particular meaning for me as a reminder of them and their wonderful wedding day.


It is a double nine patch - who doesn't love a nine-patch, and more of them has to be even better? And I used a number of stash fabrics, which I also love doing, to enlarge and enrich, even the plain teal binding came from stash (I've got a large stash...).  The country colours are easy to live with and the blocks are all extremely scrappy: the only constants are that I have separated the blues and reds, as I did for the original quilt. 


I did take a bit of trouble over the seam allowances to help the blocks lie flat.  Here's a shot of the back of the blocks.  It is a little harder to spin the seam allowances with a nine patch block compared with a four patch, but so worth doing. 


I now pretty much do it as a matter of course whenever it is possible, as it does help to avoid that lumpy bump or ridge on the front of the quilt.  It makes it less likely the needle will jump or drag when you are machine quilting across the blocks too.


The quilt measures  61" x 78". The nine patches are 4 1/2" finished, so the twenty large double nine-patch blocks measure 13 1/2" finished, sashed with 1 1/2" strips and cornerstones.  


The quilt is backed with brushed cotton plaid for extra snuggle appeal. I have kept the quilting fairly minimal, just in the ditch beside the sashing and across the diagonals of the nine-patch blocks, so the quilt is soft and cosy.  I felt an allover crosshatch would be too strong, and I wanted the fabrics to be the stars of this modest quilt.


Have a great weekend and I hope you enjoy your leftovers too!  Linking to Crazy Mom Quilts for Finish it up Friday.

Sunday, 5 March 2017

A jewel of a finish


Hi everyone, hope you have had a good weekend.  I managed a finish for Finish it up Friday - I stitched down the binding late Thursday night - but bad weather meant I failed to get the photos done in time for a link up.


Here it is anyway: my Thimbleberries Jewel Box quilt.  I've been working on quilting it all this week, but it is yet another top which I pieced a long time ago.


I have seen the design called Buckeye Beauty in Marsha McCloskey's book Quick Classic Quilts - this may have something to do with the placement of darks, mediums and lights in that featured quilt. I don't have time to research the name properly at the moment, sorry, and mine is just scrappy anyway.


The quilt is quite large, measuring 76" x 91". There are 80 blocks set 8 x 10, plus a narrow inner border finishing at 1 1/2" and outer border finishing at 5".  The blocks are 8" finished, each one is made up of two half square triangles and two four-patches.


This is a great way of using up scraps - you will need lots of 2 1/2" strips or squares, and 5" squares, so it is good for pre-cuts or leftovers from other pre-cuts projects. I have put all sorts into this quilt although it is predominantly country style colours and textures, with lots of old Thimbleberries prints from other projects.


I had such fun making these blocks and scouring my stash and scrap bags, that I find I have made enough blocks for another, equally large, quilt - so there will eventually be a pair.  Slightly embarrassing, but better to use the fabric than have it sitting around forever.


The backing was from a sale many moons ago, and I was thrilled to find a moody purple Kansas Troubles fabric in my stash which works perfectly with front and back. I'm not really a purple person - I think I may have said that before - but I am coming round to its charms and the useful place it has, being not red nor blue, neither of which would have been right for binding this quilt.


I had fun with the quilting, having done cross hatching for the last few quilts and getting ever so slightly bored with it.  I started out with the crosshatching here for stability, but then added the quatrefoil/fourpetal shape in the squares-on-point : this is easy to do as you can work it without turning the quilt more than three times (imagine a series of serpentine curves).


I then did straight line quilting in the inner border - another favourite - before turning my attention to the outer border.  Here I felt I wanted to do a crosshatch lining up with the diagonal lines in the middle of the quilt.  But the spacing wasn't quite right to be able to stitch in a way which avoided too many ends to tie in.


Then I realised that if I doubled the lines I could stitch a series of overlapping V- shapes on and off the edge of the quilt which would create the design you see here.  Plus it is more interesting than just a simple crosshatch.  I love a solution which comes from necessity and/or utility, plus almost no ends to tie in - what a great result!


A nice big quilt to snuggle under on the sofa! Hope you have a good week and manage to fit in a bit of stitching.