Hi, it's WIP Wednesday again over at Freshly Pieced, and what better day to post about the great workshop I did yesterday with Carolyn Forster at The Eternal Maker. Definitely time for another WIP but one I hope to get on with and not allow to languish on the shelf!
It was a beautiful autumn day for a drive through the countryside to Chichester, and a great excuse for some shopping during the lunch hour. I could buy a FQ of everything in the Eternal Maker, truly, and they have great sundries too, including some beautiful buttons.
Only downside was that I was rear ended at the first roundabout on the way home - and that is hardly Eternal Maker's fault! Cracked bumper, nothing worse, just a few phone calls to the insurers, but I haven't been able to get on with any more sewing this morning in consequence - shame!
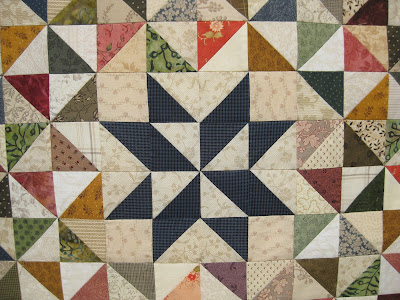
So here is what I managed yesterday: Ten 10" (finished size) blocks made with 2 1/2" strips. I have lots more pieces cut ready to play, but I am also itching to cut a few more strips from stash. It's a great scrap quilt and making the blocks is quite addictive so expect to see more photos in due course.
And here is my shopping: I don't have a lot of lime green and purple in my stash and since I am using both in this quilt I felt I could justify these fat 1/8 bundles.
Plus I couldn't walk by the Peppered Cotton half metres, also in purples: yum! I am definitely becoming more purple in my old age as I find I am wearing a purple cardigan today like in the poem! So long as my prose doesn't also become purple...
Thanks, Carolyn, for a lovely day, and I promise to finish this one quicker than the QOTG Sawtooth Stars!
Wednesday, 30 September 2015
Friday, 25 September 2015
QOTG Sawtooth Stars - finished!
Very happy to post today that I have finished this UFO quilt: I first blogged about it here on 2nd September, having not touched it for quite a few years. As I am seriously determined to clear some of my old projects I set a deadline of finishing before the end of September; I am simultaneously thrilled to have finished on time AND embarrassed that this project had sat around so long when it only took three weeks of application to get it finished....
This often happens, I find, with abandoned projects, to me at any rate: when I finally get around to tackling something that has become a major issue in my mind, I usually find I have done more than I think I have and it never takes as long to finish as I anticipate. Especially if I set myself a public deadline! Come to think of it, the same comment applies to filling in my tax return...
It feels so good to have finally finished this quilt: handstitching the binding was great.
There are 25 blocks in the quilt, measuring 78" square, making it fit nicely on top of a double bed. Each 13" framed block has a different centre so this is a sort of sampler quilt. I have never been too keen on sampler quilts but I like the way that framing each block helps to unify the design, plus the repetition of the sawtooth star shape in each block, of course.
The way value is used gives very different effects, so it is sometimes hard to see the star (for example in the photo below, the block at the right hand end of the middle row) and this adds interest.
I will not include photos of every block but here are some of my favourites: the close ups show the quilting design which was made up of intersecting oval shapes, easy to do but looks complex. The cable quilting in the sashing helps to conceal the join between the blocks.
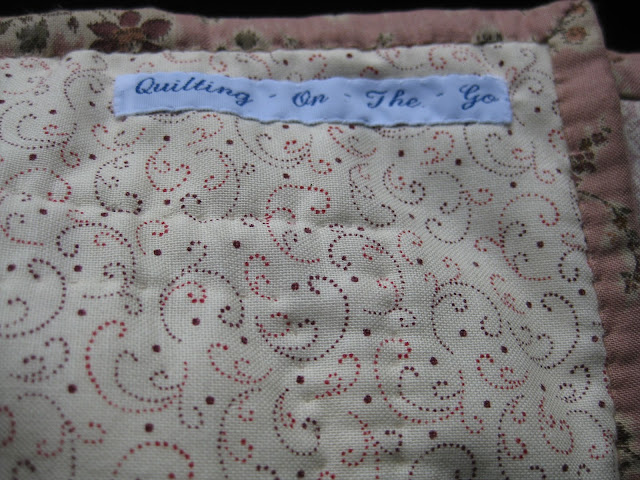
And here is the Quilting-on-the-Go label Carolyn gave me all those years ago when I did her class, which I found when tidying up recently! The photo shows off the backing fabric nicely too.
Linking today to Amanda Jean at Crazy Mom Quilts for Finish it up Friday. Hope you make progress on some of your outstanding projects over the weekend - finishing feels so good!
Wednesday, 23 September 2015
Lucky Penny Broken Dishes/Hidden Stars WIP
My WIP for today is this top made from (mostly) the Lucky Penny range by Alison Glass, which I bought from The Village Haberdashery as a FQ bundle a while ago. The palette was out of my comfort zone at the time but I just felt drawn to it. I love Alison Glass's more recent collections too.
It happened to be Free FQ week when I ordered so Annie kindly added some extra FQs which happened to co-ordinate perfectly; unfortunately I don't know the name of the extras. I also added a couple more I had in my stash from somewhere, and paired them all with grey Essex linen.
Altogether there are, I think, 15 fat quarters, each of which gave thirty two 4" (finished) HSTs. Four HSTs for each 8" (finished) Broken Dishes block, and four Broken dishes together make the 16" star block. Thirty star blocks set 5 x 6 make quite a big quilt: approx 80" x 96".
I think of hidden stars when I look at these blocks because depending on how you squint you may see the scrappy coloured stars or the grey linen stars. It is the same principle as this little quilt, made with smaller HSTs left over from another project.
Anyway this quilt top has been through several incarnations - or iterations, as my mathematically inclined son would say. I made the HSTs ages ago, and have changed my mind several times about I would set them. Finally made a decision and the top is nearly together.
Now for something completely different...
One top which I have managed to get together is my Quartet BOM - hooray! I am really, really pleased with this, though I do have to sit and pick out the remaining papers before I can layer and quilt. That's a job which definitely calls for a good film to watch.
Linking to Lee at Freshly Pieced for WIP Wednesday.
Friday, 11 September 2015
Two Friday finishes - Wedding Stars and HST Doll Quilt
Lots of photos today as I have two finishes to share with you; well, one complete finish and one finished top. I could have posted Wedding Stars last Friday but I didn't feel I should show off the pics until I had delivered the quilt to the happy couple, which didn't happen till Saturday.
So here it is, longarm quilted by my friend, Chris (bride's mother) in a design which incorporates hearts and swirls: very subtle, and we chose a soft gold thread which blends beautifully across all the colours.
The backing is a blue check flannel so it is soft and cuddly but, most important, it is sufficiently masculine to appeal to the groom!
Quilts stats: Finished quilt measures 80" x 100" (big enough for two to wrap up in on the sofa).
Nine patches made with 2" cut squares, so finishing at 4 1/2"
Hourglass blocks and plain squares are 5" unfinished
And here's my finished quilt top from Wednesday: it measures 33" square.
I chain pieced the HSTs together in rows so the little twists of thread in between kept the pieces in the right order.
I know you can use this technique when joining rows of blocks together but I always find it rather unwieldy for big blocks and big quilts. On this smaller scale it worked perfectly.
Here are the rows all ready to be joined.
I did change my mind about the pinwheel in the centre of the star; I felt it needed a stronger statement so I used more HSTs in the blue check fabric to make the star stand out more clearly.
Now to quilt it... Tempted to hand quilt but there are a LOT of seams. I think it might be machine quilting in the ditch. Any thoughts?
Linking to Crazy Mom Quilts: Finish it up Friday.
Wednesday, 9 September 2015
HST Doll Quilt
I have been making some progress on handquilting my QAYG Sawtooth Stars, and I do have a finish to post on Friday, but this week I just felt the need for something new. I have been soooo good about finishing recently, it is time for a start. But just a little one.
About a year ago I was demonstrating to a local quilt group the method I currently love most when I have to make a lot of half-square triangles - that is, using triangle papers. There are various products out there designed for this purpose: the ones I have access to are Triangles on a Roll and Thangles.
I use Thangles when I have strips of fabric to hand eg Jelly Roll strips or equivalent, or I need just a few HSTs in each fabric combination; and I use Triangles on a Roll when I have larger yardage to use up or need to make a lot more HSTs.
So because I was demonstrating, I made HSTs in scrap fabric in reproduction colours/style and it was a great opportunity to have a good clear out of larger chunks of scrap at the same time. These HSTs were made without any special project in mind other than a general idea of making a Dutch Chintz style quilt at some time in the future. Since then I have been adding to the stockpile any HSTs left over from other projects too, trimming if necessary to the same size.
Today felt like the day to get them out and make something! I have had my eye on this lovely doll quilt by Edyta Sitar of Laundry Basket Quilts. The pattern is in her book, Scrappy Firework Quilts.
But I wanted to use my HSTs which are 2" finished, rather than make small ones as per Edyta's design, which measure only 1 1/4" finished (!). I put a pinwheel in the middle of my Sawtooth Star because I couldn't find any more blue checked fabric (what's the betting it will turn up as soon as the quilt is sewn together?).
And the borders will be a floral fabric which I had unpicked from a previous project and had shoved back in the cupboard - it wasn't quite right for that project but I think it will be OK with this one. All in all, this is a WIP which I stand some chance of finishing quite quickly, having started from pre-made pieces!
So it is a little different to the original, but isn't that what we like about quiltmaking? Start with an inspiration and adapt to one's own needs or vision. Each time we make a quilt it is new made, as we never can replicate the exact fabric choices (unless purchasing a kit, I guess).
So here is my quilt, laid out but not stitched together - tomorrow's task. It will be too big for most dolls but a nice size to top a table.
Linking with Lee at Freshly Pieced: WIP Wednesday: glad to see she is starting more than she is finishing too...
About a year ago I was demonstrating to a local quilt group the method I currently love most when I have to make a lot of half-square triangles - that is, using triangle papers. There are various products out there designed for this purpose: the ones I have access to are Triangles on a Roll and Thangles.
I use Thangles when I have strips of fabric to hand eg Jelly Roll strips or equivalent, or I need just a few HSTs in each fabric combination; and I use Triangles on a Roll when I have larger yardage to use up or need to make a lot more HSTs.
So because I was demonstrating, I made HSTs in scrap fabric in reproduction colours/style and it was a great opportunity to have a good clear out of larger chunks of scrap at the same time. These HSTs were made without any special project in mind other than a general idea of making a Dutch Chintz style quilt at some time in the future. Since then I have been adding to the stockpile any HSTs left over from other projects too, trimming if necessary to the same size.
Today felt like the day to get them out and make something! I have had my eye on this lovely doll quilt by Edyta Sitar of Laundry Basket Quilts. The pattern is in her book, Scrappy Firework Quilts.
But I wanted to use my HSTs which are 2" finished, rather than make small ones as per Edyta's design, which measure only 1 1/4" finished (!). I put a pinwheel in the middle of my Sawtooth Star because I couldn't find any more blue checked fabric (what's the betting it will turn up as soon as the quilt is sewn together?).
And the borders will be a floral fabric which I had unpicked from a previous project and had shoved back in the cupboard - it wasn't quite right for that project but I think it will be OK with this one. All in all, this is a WIP which I stand some chance of finishing quite quickly, having started from pre-made pieces!
So it is a little different to the original, but isn't that what we like about quiltmaking? Start with an inspiration and adapt to one's own needs or vision. Each time we make a quilt it is new made, as we never can replicate the exact fabric choices (unless purchasing a kit, I guess).
So here is my quilt, laid out but not stitched together - tomorrow's task. It will be too big for most dolls but a nice size to top a table.
Linking with Lee at Freshly Pieced: WIP Wednesday: glad to see she is starting more than she is finishing too...
Wednesday, 2 September 2015
Quilting-on-the-Go Sawtooth Stars
After some rather project heavy/picture heavy posts here's a quick one with just one project. This is my 'new' hand quilting finish-it-up WIP: quilt-on-the-go Sawtooth Stars.
I started this in a class with Carolyn Forster using the method that she later published in her first Quilting-on-the-Go book, published in 2007 (there is a second book published quite recently); this involves disguising the joins with quilting in the wide sashing.
It is a great book full of lovely quilts with novel ways to hide the joins, but I guess this is not really my preferred method of quiltmaking. Don't get me wrong, I loved the fact that I could make the blocks, layer, and hand quilt them individually while out and about - in my case while watching my daughter play cricket. Even more, I loved being able to use up 20" square wadding offcuts.
But I did not enjoy the process of putting the blocks together in rows, and I enjoyed joining the rows even less, which is why I ground to a halt some considerable time ago. I had done more quilting than I remembered, however, so it might not be quite such a long way to the finish line as I had feared.
Joining the rows you cannot really do on the go, you need a reasonably large flat surface. I am using my ironing board lowered to a comfortable height in front of a window as I need good daylight to see my quilting lines. This is limiting me to sewing in the day as I am waiting for delivery of a decent task lamp for sewing.
So still very much a WIP but my aim is to finish and bind by the end of September. Fingers crossed.
I started this in a class with Carolyn Forster using the method that she later published in her first Quilting-on-the-Go book, published in 2007 (there is a second book published quite recently); this involves disguising the joins with quilting in the wide sashing.
It is a great book full of lovely quilts with novel ways to hide the joins, but I guess this is not really my preferred method of quiltmaking. Don't get me wrong, I loved the fact that I could make the blocks, layer, and hand quilt them individually while out and about - in my case while watching my daughter play cricket. Even more, I loved being able to use up 20" square wadding offcuts.
But I did not enjoy the process of putting the blocks together in rows, and I enjoyed joining the rows even less, which is why I ground to a halt some considerable time ago. I had done more quilting than I remembered, however, so it might not be quite such a long way to the finish line as I had feared.
Joining the rows you cannot really do on the go, you need a reasonably large flat surface. I am using my ironing board lowered to a comfortable height in front of a window as I need good daylight to see my quilting lines. This is limiting me to sewing in the day as I am waiting for delivery of a decent task lamp for sewing.
Linking to Lee at Freshly Pieced for WIP Wednesday.
Subscribe to:
Posts (Atom)