Friday, 1 April 2016

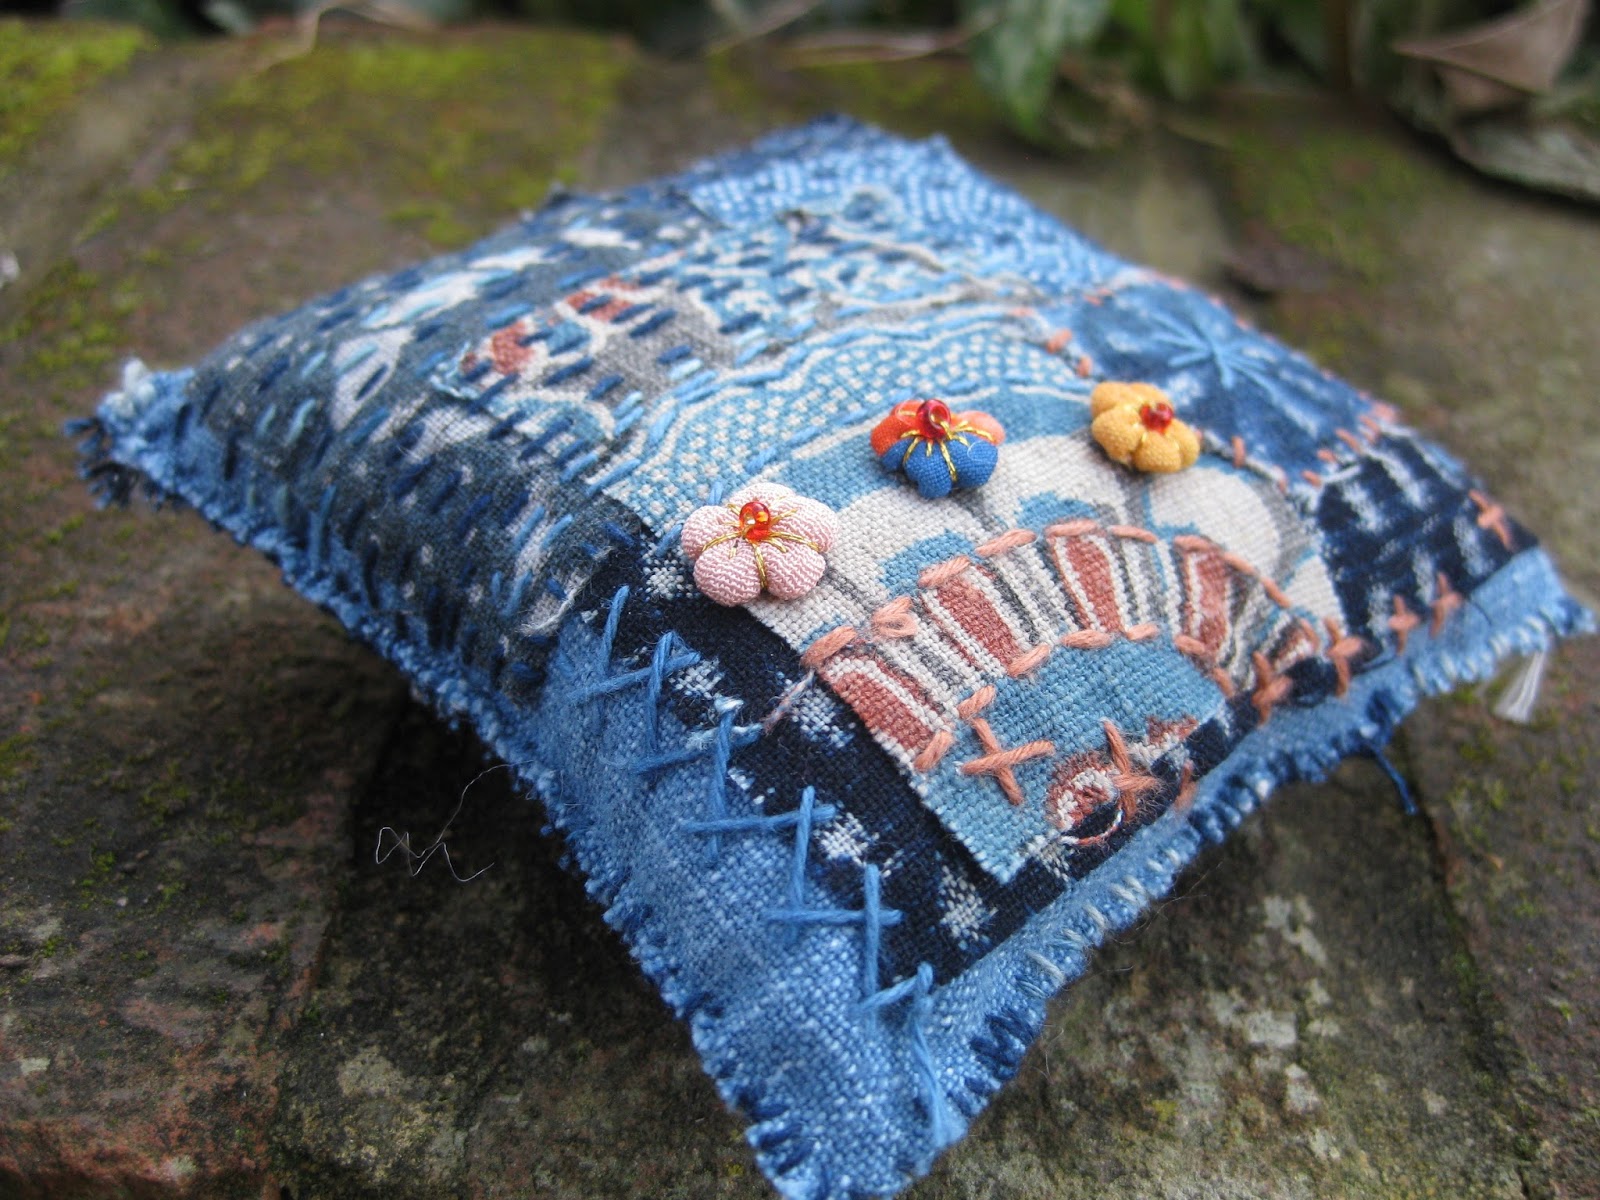
Japanese pincushion: boro and sashiko


Gosh, what a rush the past few weeks have been: I have just got back from moving my daughter north for her new job and new flat in a new city.  I shall miss having her at home, though not the early morning/late night trips to the railway station.  Younger son back for university hols so my husband and I are not quite empty nesters - three weeks to go...  

And three weeks till I go on a quilting jolly to the French quilt show organised by Quiltmania in Nantes, Pour l'Amour du Fil.  Much more about that in later posts, I hope.

For today though, I am looking back about three weeks to a lovely day I had with sewing friends Mary, Sylvia and Helen.  We had a mini workshop round Mary's kitchen table, hand stitching under Helen's guidance a piece of sashiko and a boro-inspired piece to make a double sided pincushion.


Helen has lived in Japan and she brought along wonderful fabrics and threads to inspire us and the most amazing Japanese patchwork books.  The time flew past as we stitched and chatted, refreshed by a delicious lunch Mary had prepared.  It was bliss to take time out and enter a different zone, a more peaceful place where we concentrated only on the next stitch.

I had done sashiko before, some years ago, and very much enjoyed it; although it looks simple - and very elegant in the crisp contrast of white thread on plain indigo fabric - the discipline of trying to make the stitches even and not to cross threads is surprisingly challenging.


I had never tried to imitate boro before and I don't think I have done a particularly brilliant job, but I did enough to get a feel for what it is/was: the patching of worn out cloth with precious scraps, all stitched together, sometimes with decorative stitches but usually with a simple running stitch.  The resulting textured collage is admired now as art but grew out of necessity, at a time when cloth was so precious it was never thrown away, but continually repaired.

Helen was able to show us some beautiful examples of boro pieces she had bought; it was quite moving to handle the cloth and feel perhaps a small connection to the women of the past who had patched on the small pieces to strengthen and repair the garment.  It made me think of my husband's grandmother who loved to darn the family's socks, another uncommon activity nowadays.

Here is a little article which tells you more about boro: if you are interested you can find lots of examples of boro on the internet and Pinterest.

As you have probably gathered if you have looked at my blog over the past couple of years, I am pretty much wedded to my sewing machine and rotary cutter; I don't do much hand sewing other than the bindings on my quilts or the occasional hand quilting project, which often takes years to finish.  But I so enjoyed our slow sewing day and the companionship of like-minded friends.

Having said that, it has taken me three weeks to actually get around to finishing off the little pincushion so I can show it to you today.  And I hardly had anything left to do, shameful really that I had delayed, because the truth is that it doesn't actually take all that long to make something lovely by hand - I just think it does.  So thank you Helen and Mary for a memorable day, and a pincushion to remind me to do some slow sewing now and then.


The pincushion measures 4" square and the two finished pieces of fabric are simply whipstitched together around the edge.  The tiny flowers are made from kimono silk by nimbler fingers than mine and measure just 1/4" across. All the materials were a very generous gift from Helen, who has collected so many small treasures on her travels and was so kind to share them with us.

Linking today to Crazy Mom Quilts for Finish it up Friday.  I am hoping to be back on track with some more finishes before too long - I haven't quilted my Scrap Vortex quilt yet - though the garden has now woken up....

Hope you have a productive weekend, whatever you choose to do.

Saturday, 12 March 2016

Paint chip cushion - started and finished

I have been doing a lot of sewing of scraps lately, building up piles of blocks but not anywhere near finishing a quilt. Here's a glimpse of what my sewing room (aka dining room) has looked like recently:


It felt like time I made something from start to finish in hours rather than weeks - or months...

I have had a little pack of 2 1/2" squares sitting on my shelf since NEC Festival of Quilts last August. The collection is Modern Background - Ink by Zen Chic for Moda. The pack was a freebie from the Moda stand - so generous, I love Moda fabric and it is great to get to try out a whole new line.


I decided to go with the shaded 'paint chip' style layout which I have seen elsewhere on the internet. I know there has been something similar on both Crazy Mom Quilts and Lily's Quilts in the past. We are starting to think about repainting our house as our kids have more or less moved out, and grey is one of our favourite wall colours, so it's quite appropriate for that reason too, surrounded as we are by shade cards and tester pots.


The number of fabrics in each tonal group dictated the layout as five rows of eight squares: there were 42 squares in the mini charm pack and I therefore had just 2 squares left over. I love not having oodles of spare - it doesn't happen very often: see top photo...


I pieced the squares together with 1" (cut size) sashing in an off-white solid from my stash (sorry, no idea what colour or make), joining the rows first, then using a long 1" strip between each of the rows and top and bottom.  

So the sashing finishes 1/2" and the squares 2". The cushion ends up as 13" x 21" or thereabouts. I used an offcut of cotton wadding and calico to back the front and give some body, and I quilted along the middle of the sashing strips for minimal texture in keeping with the crisp clean lines.


I was able to find a suitable fun backing in my stash and used the envelope method which Amanda Jean of Crazy Mom Quilts describes here, adapted to my rectangular cushion. I also had to make a cushion pad insert as I couldn't find one this odd shape/size for sale on the internet. It was a good way of using up spare polyester wadding which must be 15 years old.

So all in all, this was a good and quick project which used my stash and cleared my mind. Having everything on hand meant there were no delays, and knowing my daughter had her eye on the finished cushion was an extra motivation.

I am linking to Crazy Mom Quilts for Finish it up Friday as I finished late last night, too late for a good photo which I had to do this morning, but within the spirit of the linkup. Hope you manage some sewing too this weekend.

Wednesday, 2 March 2016

Bushel Basket/Log Cabin Squares


So pleased with this top, I cannot save it for Friday!  I had so much fun (and made quite a mess!) making the blocks and playing around with colour combinations.  Blogged about it here first (scroll to the end of the post).


It is so satisfying to take a bundle of skinny strips and make neat little blocks which stack up nicely ready to be stitched together.  I worked on them over a few days, here and there in between all the other tasks which needed doing.  Stitch a few, press a few, repeat.  Each time I got to add a new colour I felt a little burst of excitement. Simple pleasures...


I am including lots of pictures so you can see the variety of fabrics I was able to use (and use up!). The palette is predominantly country/traditional (though I think it would look fab in modern brights too) as those were the oldest scraps, the ones I was most keen to use.


You may be able to spot lots of Thimbleberries fabrics left over from the two Thimbleberries scrap quilts I made last year, which in turn were left over from another Thimbleberries quilt I no longer have (I always over-purchase fabric for projects...), but I also managed to slip in a few batiks in murky colours, and some checks and simple stripes which always give a bit of life to a quilt, I feel.


And how perfect is this floral backing I had in my stash, bought in a sale a year or two ago because I loved it so much.  So this really is a quilt top from stash - best kind for assuaging my guilt over past excessive purchases...


Some vital statistics to finish off: the top measures 56" x 64"; there are 168 x 4 1/2" blocks (finished size) set 12 x 14 blocks.  Most of the centre squares are 1 1/2" finished with three rounds of 'logs', but about 20 blocks have 2 1/2" finished size centres and only two rounds of logs.  The logs finish at 1/2", having been cut  from 1" strips.

The block is a classic Log Cabin variation where the logs are added in opposite pairs (as for Courthouse Steps) but with just one colour/fabric in each complete round.  I was inspired to make the quilt by the Bushel Basket quilt in Edyta Sitar's book, Scrappy Firework Quilts published by Landauer in 2012, but I decided not to include the 6" strippy border.

Hope to get this one quilted quite soon: I have a bit of a quilting backlog...

Friday, 26 February 2016

Scrappy and proud


This week I have still been in overdrive, chain piecing madly and determined to use up some of my scraps. In the photo above you may recognise the colour palette of my Wedding Stars quilt from last summer.  

I loved making that quilt because I was really comfortable with the colours the bride chose from my stash.  What's not to like about country reds and blues? And lots of different fabrics, the more the merrier.


When tidying up recently I came across the box where I had packed away the leftover squares: there were quite a few so I chain pieced a whole lot more nine patches, some with red centres, some with blue, just as for Wedding Stars.

I wanted to make a different layout however (partly, I confess, because I wasn't in the mood to make hourglass blocks, which are more fiddly than nine-patches) so I looked in my stash for what I could use.


I turned out some remnants of brushed cotton plaids and chose to use the non-brushed side, and to go for a scrappy double nine-patch layout. I decided to sash the big blocks but did not want the sashing to overwhelm the pieced blocks: I found some ticking-type stripes in red/oatmeal in three different widths which had been in the cupboard for years. Not enough of any one fabric, so I decided to use a bit of all three in keeping with the scrappy, 'use what you've got' ethos of the project.


Please excuse the quilt top being slightly crumpled in the photos - it was ironed but then folded with creases in.... So annoying when that happens.


I included this photo to remind you about opening your seams when you make four-patches and nine-patches.  It is easy to do (provided you do not use an excessively short stitch length) and makes the seam intersections lie very flat which is a help when you come to quilt the top.  

Because I prefer to nest/butt seam allowances wherever I can, rather than press them open, this for me is a good solution to the problem of bulky seam intersections.


So, all things considered, a good result: I used only what I had to hand, and I cleared up the leftover squares lurking in the cupboard. This seems like a 'free' quilt top, though I think I may have to buy a backing.... it's a good size (63" x 78") and it was relatively quick to make, with plenty of straightforward sewing at speed, my favourite!

As it is a finished top, I am linking to Crazy Mom Quilts for Finish it up Friday.
Hope you get a chance to enjoy making and/or finishing something this weekend.

Tuesday, 23 February 2016

Fabrications and fabricating

One nice thing which happened during the mayhem of the last few weeks was that I received copies of Fabrications magazine for Jan/Feb and March/April, as I am lucky enough to have quilts featured in both.  Here is a copy of the mags and there follow some of my rather more amateurish pics of the quilts:


The chevron baby quilt (on the cover of the March/April mag) uses the method without half-square triangles which has been around on the internet for a while.  I don't know which genius first invented it or I would credit them, but what I did for the magazine was draft a version which you can make with just one charm pack of 5" squares and 1.25 metres of background.


This version makes a small but acceptable size baby quilt (34" x 47") with only a few 2 1/2" squares left over, and it fits on a single width of backing fabric.  With a bit of luck you might, like me, also find some leftover wadding to use too!


I do love to see just what it is possible to do with pre-cuts.  They have become a part of all our lives since they first appeared and it is hard to imagine life without them. I am often guilty of buying a single Charm pack on a whim and not having a clue what to do with it when I get home.  Am I alone in this?

My other quilt was featured in the Jan/Feb issue and called Sweet Beginnings.  It's a rather different palette than I usually use and quite low-volume.  


I wanted to feature the linen novelty prints and play around with value to give each block a different emphasis.  I also did not want the sashing to detract from what was going on in the blocks, so I used a cream Essex linen and scrap squares for the cornerstones.


OK, so the quilts for the mags were made a while ago, to allow for editorial/publication schedules: what am I fabricating now?  Funny how fabricating nowadays has the sense not of making, constructing, manufacturing, but rather of 'making up' a story or forging a document.  I digress.

Well, rather than finishing any of the many things I have started, I felt in the mood for some serious chain piecing and to spring clean some of my scraps.  I have always wanted to make a Bushel Basket quilt from Edyta Sitar's book, Scrappy Firework Quilts, and now seemed to be the right time....  Right for me in the mood I am in, not necessarily right for the rest of the family who might have preferred me to tackle some actual spring cleaning of the house.


So the weekend was spent in trimming scraps into 1" strips (yes, 1" strips) cross cutting into pairs of rectangles, and chain piecing madly.  I don't consider myself a particularly addictive personality, but this sort of sewing definitely brings out my compulsive side.  The urge to make 'just a couple more' of the dainty 5" (unfinished) blocks and to keep on playing with colour and value was irresistible.  And I didn't even try to resist, with the result that I have now made 101 blocks out of the 144 I probably need.  I say probably because I don't want to make the border featured in Edyta's book, so I may make more blocks and finish off with just a binding.


The great thing about sewing like this, and the reason it appeals to me so much, is that provided you can leave your strips out you can stitch a few strips between other tasks and pick up where you left off really easily, which isn't true of a quilt requiring more complex cutting or piecing.  Also I have enjoyed poking through my stash for odds and ends which I can chop up and add to the mix. Although the strips are skinny it is surprising just how much fabric you can 'tidy away' into a useful scrap quilt.  Very satisfying. 


Friday, 19 February 2016

Sampler Block Shuffle - update

Just catching up after 10 days without sewing a stitch - hospital visits and associated rushing around for my MIL and a number of other things on the domestic front I won't bore you with.  After all, this is a space for creativity, relaxation and making things which stay made, not for the general stuff of 'real' life.


I have missed sewing so much, it is my way to unwind and have some personal time, and accordingly is always the thing which gets squeezed out by more pressing needs.  So when I have the chance I go a bit overboard to compensate.  First to receive my attention were my Moda Sampler Block Shuffle blocks, which I was up to date with when I last posted about them (here).


On Tuesday I finally managed to make up for lost time and I have now made all the blocks, some of them once, some twice and a few three times in different colour/value arrangements.  The decision how many to make was influenced by a) how much I liked the variations shown on the pattern sheet, and b) how many pieces there were in the block - some blocks much more intricate than others.


Whilst I really like the intricate blocks, they are quite fiddly (finishing at only 6") so that may have influenced my decision...


Anyway I finally got around to counting how many blocks I have made and discovered that, rather than the 30 for which patterns are provided, I have made 60 (and I didn't use the two applique blocks at all).


I always intended to make more as I don't want to set the blocks with plain alternate squares, but I was slightly surprised to find just how many extra I had made.


I can really recommend the process of making just a few blocks at a time over a period: it was relatively painless.  I kept all my fabrics for the quilt in one place, using a FQ stack of an old reproduction line called Calico Craze by Barbara Brackman & Terry Clothier Thompson for Moda, with a few extras and neutrals thrown in.  This meant I didn't spend ages looking through my stash for particular fabrics, I just chose from what I had pre-selected.

To eliminate fiddly cutting of single squares, I cut strips in the required widths and cut the squares and rectangles I needed from the strips, returning the strips to the box and then going back to those cut strips for squares for future blocks; this had the further benefit of making me use what I had already cut and therefore being a bit more adventurous with my fabric combinations.

Making the blocks in several variations also freed up my fabric/colour choices within the limited palette.  As I have so many blocks to choose from in my layout I feel more relaxed as I can always reject any I don't really like.  And because the blocks weren't very big and didn't really take all that long to make individually, I was less bothered about 'making mistakes'.

I am still mulling over what layout to adopt.  The blocks are meant to be set on point so I may stick with that idea and put them together with a narrow neutral sashing: there are a lot of seams so a buffer between blocks would make my life easier and I think would help it all to lay flatter than trying to join the blocks together edge to edge.  Time to look at some Dear Jane quilts on Pinterest for inspiration - those blocks finish even smaller, at 4 1/2".

Finally, as time is ticking away for my Bargello Wedding quilt (blogged here) I managed to staystitch the edges, seam the backing fabric, press everything and deliver to my friend Chris who will be long arm quilting it for me.  Just a teasing photo for now but I will reveal properly in due course.


As I have now finished this quilt as much as I can, except for the binding, I am claiming a finish and linking to Finish it up Friday with Crazy Mom Quilts.  I love the Pixie basket and will definitely be making one of those this weekend!


Hope you manage to finish something too.  Have a great weekend!

Friday, 5 February 2016

Joint finish: Sawtooth Star cushion


Hi everyone - Happy Friday.  Happy to reach the end of a very busy and productive week.  Not much on the sewing front but I had a mini-trip to Glasgow with my daughter at the beginning of the week. 

She is moving to a new job as part of her graduate training scheme and will be spending 18 months working in Scotland.  I was actually born in Glasgow but left as a child (no trace of an accent now), so it was all new to both of us.

Have to say, despite cold, wind and rain, we thoroughly enjoyed ourselves and I think she will have a great time.  We found a lovely flat-share (fingers crossed while the paperwork goes through), stayed in a nice hotel, and walked and walked.

More mother-daughter time followed when we got home as she suddenly wanted a new cover for a cushion she made when she was about thirteen (where have those ten years gone?).  She is not much of a sewer as she has always been busy with sport and study, but she can do it when she tries, so this is very much a joint project, and she wanted me to post it on the blog.  Though she didn't want to appear in person!


I did the calculations and cutting out; she sewed the patches together; I added the backing and binding and even tackled machine binding for the first time.  Having always been a bit of a purist about hand stitching the binding, I was quite pleased with how this went.  


Here is a tutorial by Rita of Red Pepper Quilts which covers making a straight grain doublefold binding as well as the machine stitching side of things.  It is quite old now (2009) but covers all important points.  I generally cut my bindings 2 1/4" and join the ends with a diagonal seam in much the same way as Rita.  So very happy to recommend this method if you are new-ish to quilt binding.  


I used Clover wonder clips to hold the binding in place rather than pins which Rita shows - probably because Clover hadn't invented the clips in 2009!  Here's a fun video of the clips in use; I must say I hadn't noticed the little dots on the reverse were 1/4" guide marks - you learn something new every day!

The cushion is not large, just 12" finished, so the maths was pretty easy: 4" centre square, 2" x 4" flying geese for star points and 2" squares everywhere else (add 1/2" to all these finished measurements for cutting).

My daughter is pleased as Punch with her achievement, so maybe she will become a fully fledged (aka obsessed) quilter in the future, when she has more time.


And here's a picture of my new coffee mug which I think is a pretty good match for the colours of my new blog heading - do you agree?

Linking to Crazy Mom Quilts for Finish it Up Friday - love Amanda Jean's finishes and her photography.  She also has a binding tutorial - the link is in Rita's tutorial.  They both produce really good quality work and I admire that so much.  It's usually just as easy to do it right as wrong provided you have good instructors and instructions.