Wednesday, 30 January 2019

Happy remaining 11/12ths!


Where has January gone?  I have been wanting to get back to writing my blog for ages, but all my good resolutions have evaporated in a blur of admin - house admin, kids' admin (even though they are sort-of grown-up) and village admin.

So not much sewing till a few days ago when I did a class at my LQS, Patchwork Cabin, which will shortly be closing its doors after ten years.  Now I am all fired up to make 2019 a productive sewing year, so let's start with a recap on the last quarter of 2018:


Going backwards in time, I made some Christmas decorations with mt patchwork girls, Miriam and Sophie, using this tutorial from Mr Domestic.  They were a lot of fun and didn't take long, so bookmark them for next year to decorate your tree.  No sewing involved so good to make with youngsters too - and you could use sparkly paper instead of fabric.

We also made 3D fabric snowflake stars with Jennifer of Shabby Fabrics using this tutorial but I don't seem to have taken a photograph - sorry.  I can also recommend this video as the instructions are clear and precise and the snowflakes worked out perfectly.  I will try and add a photo tomorrow.

Apart from Christmas decorations, my recollection was that I didn't do much sewing between September and December, but looking back I did make progress on my Karen Styles project, Robin's Nest, which I last blogged about here.


The nice thing about this project, I have decided, is that preparing the different components will fit into small spaces of time in the way that knitting or embroidery/cross-stitch does.  When I only have ten minutes or half an hour I can cover a few hexagon papers or stitch a few shapes together by hand, whereas I probably wouldn't bother to sit down at the sewing machine if I only had such a short amount of time available.


There are some elements which can be chain pieced too, so I am not abandoning my machine altogether in favour of slow sewing; a reasonable amount of progress has been made over the past few months, though I will still need a good stretch of time to lay out all the elements and start putting the medallion borders together.


My other achievement in the latter part of 2018 was to complete a quilt in an altogether different style and palette for a friend who was married a little over a year ago.  This was a joint project with my friend Chris - we all met in antenatal classes a long time ago - and although I have known Chris for thirty years and we both sew a lot, we have never made a quilt together..


Here are the fabrics our friend picked as her starting point and this is the pattern she found on Pinterest (Star Jewels by Chasing Cottons, better photo on the blog here, scroll down).  Fortunately I have a lot of Kaffe Fassett fabrics in my stash and love the colour palette she chose.

And here is the finished quilt, pieced jointly by Chris and me and longarm quilted by Chris at the Quilt Room.  We chose a wavy modern linear pattern with a soft pink/purple variegated thread.


The backing fabric I ordered from Hancock's of Paducah as I couldn't source it in the UK and we only had a small piece.  I don't usually order fabric from overseas but it just seemed the perfect choice (it is Wind Song in Turquoise from Amy Butler's Night Music collection).

By the time I had paid VAT and handling charges on arrival in UK it worked out about the same price as it would have done here, but at least I was able to get it. The binding is by Alison Glass.  We made the final border a little wider so I think the quilt finished at 78" square, a really good size for snuggling up on the sofa.


I love the quilt so much (and so does our friend, fortunately!) that I really want to make one for me - but it will have to join the end of a very long list of projects.  It was a great pattern and went together really well.  And making for someone else, and making with someone else, setting time aside specifically for that purpose, certainly kept the momentum going.

I must finish on a slightly sad note and say how sorry I am that two of the blogs I have followed for several years are no more: Rita at Red Pepper Quilts has stepped back, certainly from posting regularly, and Amanda Jean of Crazy Mom Quilts has retired after 12 years of blogging.  I loved both these blogs and have been tremendously inspired by their posts: I wish them well in the future, whatever it holds.

But here are some lovely photos of the woods taken today: who can be sad when the sun is shining and the sky is blue for the first time, it seems, in weeks?!  Tomorrow is a new month with lots of possiblities, and maybe I will even find time for some sewing?


Wednesday, 5 September 2018

Small project roundup


Having not managed to do much sewing myself over the summer, I have nevertheless managed to keep my students working on their various small projects and they have achieved a few finishes.  I thought it was time for a roundup of what they have made since the bunting bonanza (blogged here).

First up were some threadcatchers, made from stash fabric and scraps - see this excellent tutorial


Miriam made the two on the right and Sophie the one on the left.  We used Bosal In-R foam as the interlining so they are pretty sturdy and a good size: the girls mostly use theirs as baskets for fabric scraps and small blocks, whereas I use the one I made a while ago as a fabric wastepaper basket, for all my trimmings when cutting.  Having a nice tabletop receptacle has made me much tidier!

Next we tackled foundation piecing (free paper pattern here to download from Pieced by Number) to which we added a rainbow border of HSTs to enlarge the cushions to 16" square:


We also learned how to set in concealed zips (good tutorial here) which give a very professional finish, and added an external binding to finish the raw edges:


Sophie's cushion has the pink binding and Miriam's the blue.  They both did a great job, though the foundation piecing wasn't the easiest for beginners because of the funny angles involved.  The impact of the finished piece is great though, and they chose different quilting designs to personalise their cushions despite sharing the rainbow fabrics and background grey.

Next, and including a foundation pieced strip of flying geese, the girls made boxy pouches following a tutorial in this issue of Love Patchwork and Quilting [Sophie has my copy so the details of the tutorial will follow]:


Miriam made this one first to test the pattern, and then they each made the ones below (Sophie on the left following the rainbow theme and including a toning violet zip, and Miriam on the right with her favourite rich jewel colours picking out the colours in the main fabric):


Here are the other sides so you can see the colours used:


And here are the underneath/bottoms of the pouches - rather a shame that most of the time the bottoms won't be visible!   You will see that Miriam chose to modify the pattern so that her flying geese would all point towards the zip. whereas Sophie went for a continuous rainbow of colours.  It is great to be able to adjust a pattern to meet one's own aesthetic.


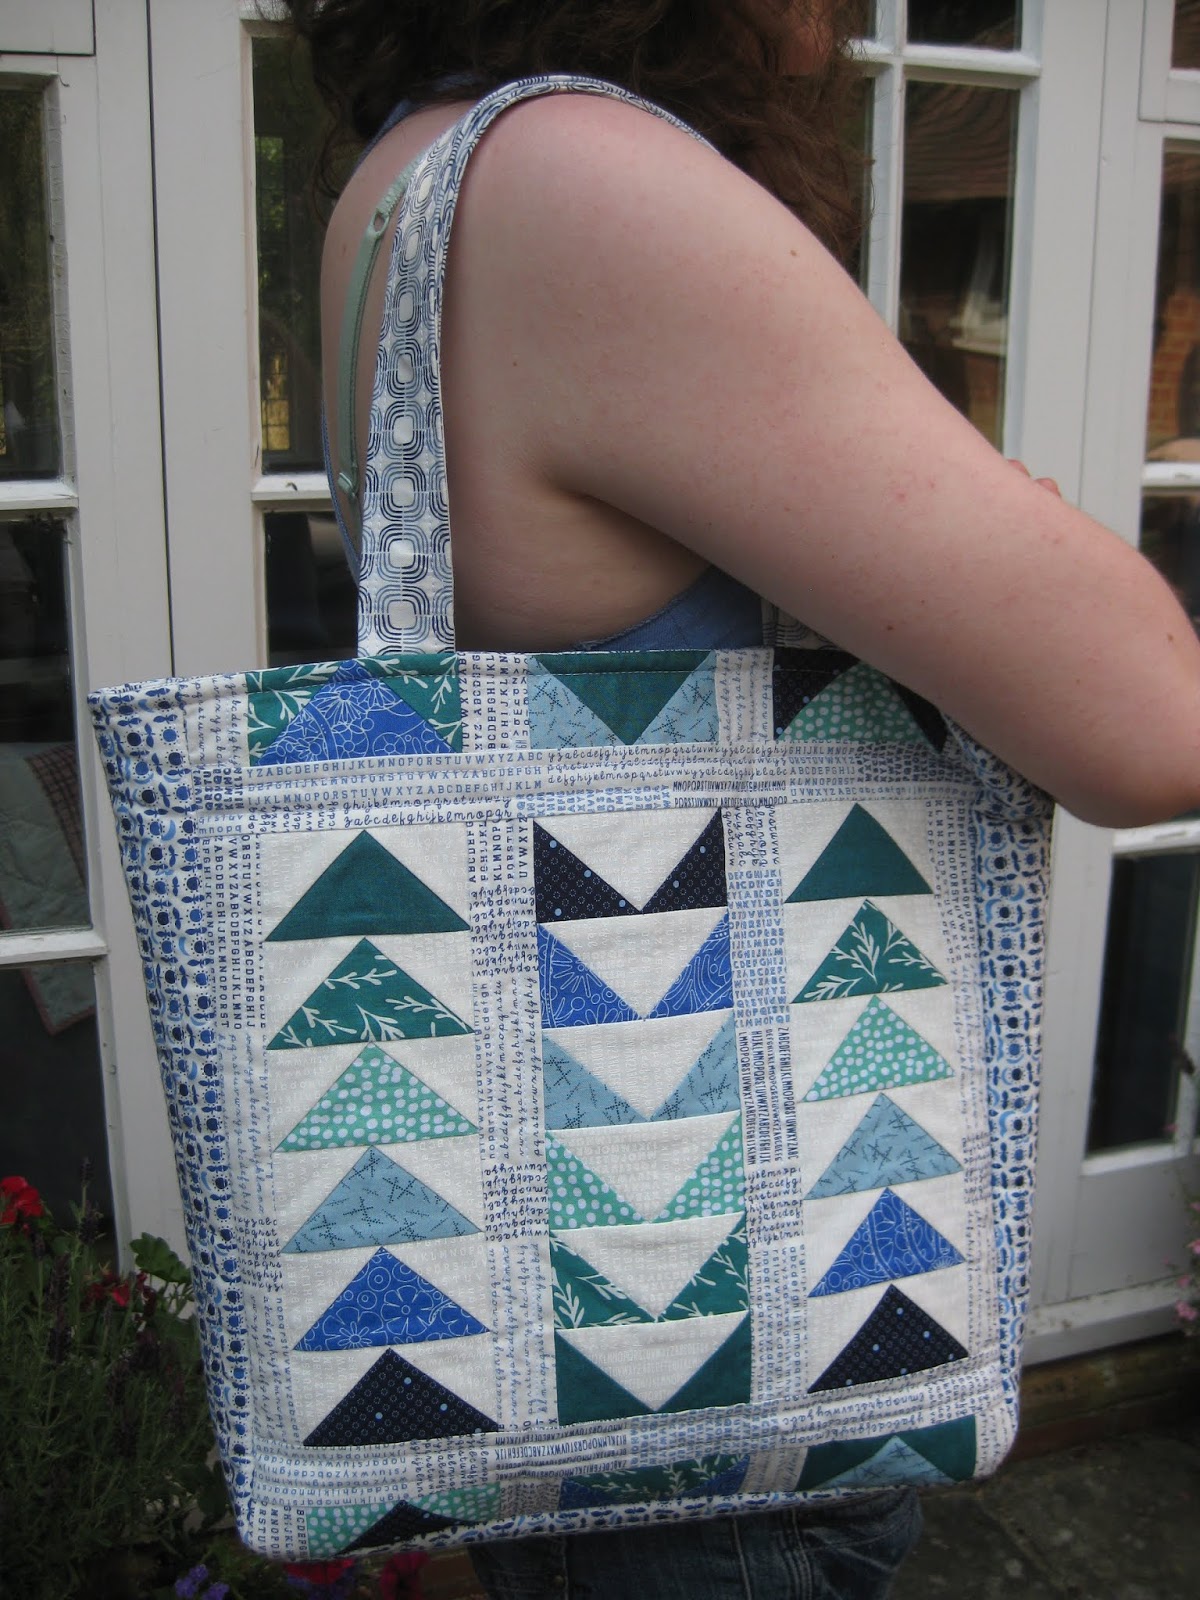
Lastly, we made bags: Miriam has made several bags before but this was Sophie's first.  They chose different patterns, both for blocks and for construction.  Miriam was making hers as a gift and went with flying geese again, pieced this time by the stitch and flip method and trimmed with the special Bloc_loc ruler to be precisely 1 1/2" x 3" finished.


From recollection, the bag finished at around 13" wide by 14" by 3" deep.  I am being a bit vague because Miriam worked out the design and layout of the blocks as she went along, based on how big overall she wanted the finished bag to be.  She came up with the idea to invert the central row of geese and to reverse the colour values.


We used waistband interfacing to make the straps both firm and accurate - much easier than fighting with scraps of wadding.


This bag was finished with a lining which turned inside out through a gap in the lining (the most common method) so the raw edges are all concealed.  Sophie's bag was made by a different method.


Here is Sophie's bag, made to hold her baskets of fabric to bring along to our sewing sessions.


We followed a tutorial from Moda Bakeshop called Clermont Farms Quilted Tote Bag by Glen Dragone, which I printed out many years ago (2010 is the date on the pattern!) and always intended to make but never quite got around to, so I was delighted when Sophie said she would give it a go. 

Here is the link: I've linked to the pdf/printer friendly version as the photos weren't loading on the link via Moda Bakeshop's website.


We wanted the bag to hold its shape and stand up well so it would accommodate two baskets full of fabric, so Sophie used a foam interlining rather than wadding offcuts.  It is not too stiff however and wasn't difficult to quilt.


The construction method for this bag involves quilting through the outer pieced section, interlining and lining, so the raw edges on the inside have to be bound.  The advantage is that the bound seams give extra strength and structure to the bag, but it is slightly fiddly to set in the base and manage the final binding where the panels intersect.  Sophie did a great job however and you will see how neat the inside corners are in this photo.


The finished bag measures 13" x 13" x 7" deep.  The squares and strips are cut from 2 1/2" wide strips so the bag is jelly roll friendly.

So that's been our summer.  I hope you will agree it has been a productive one for my students, if not for me.  I will have to pull my socks up to stay ahead of them this autumn!

Thursday, 23 August 2018

Back in the (sewing) saddle again


[Not my quilt! - read on]

After an interlude far too long to dwell on, I am finally back sewing and blogging.  A variety of tasks and activities have kept me away from my machine, some pleasant, some less so, but it feels  good to have spent a few days at last with fabric, needle and thread and I wanted to share what I have been doing: HAND PIECING!!!

Yes, I know - you can't chain piece by hand, but months ago I had booked two workshops by Karen Styles of Somerset Patchwork which were held at Cowslip Workshops last week.  Having enjoyed Karen's classes last August (and despite having made no progress at all on the quilts I started then...) I signed up and arranged our family holiday in North Cornwall to fit the dates...


Here is the view from Cowslip across the valley to Launceston Castle.  As you can see, our glorious and uncharacteristically hot summer has ended (we were 75 days without rain in Surrey) and the weather was much more typical of a usual August.  I love this scene, whatever the weather, and we were happily sewing so who cares if the sun is shining...


We stayed in a remote 17th century National Trust cottage down a very steep track in the Valency Valley, near Boscastle.  It was so quiet and peaceful, no WiFi or mobile phone signal, perfect for recharging human batteries.  For literary fans, I walked the dog up the valley to St Juliot Church where Thomas Hardy met and courted his first wife, Emma Gifford.


The quilt at the top of this page, Robin's Nest, is the one I was particularly attracted to making as it seemed to me there was quite a lot I could machine piece.  I do like intricate traditional quilts but I have to be realistic about how much time I have (not a lot recently, alas) so my sewing machine is always the tool of choice.


Here are a couple of closeups of Karen's beautiful quilt to show some of the elements:


and here is what I managed to make in the course of the day:


It may not look like much but I was quite pleased as it isn't always easy to achieve a lot in a class situation where there is a lot going on (not just chat!) and new ideas to absorb. 

I machine pieced the small red stars (3" finished) and set them into a ring with 60 degree triangles.  I handpieced the triangles to the stars which didn't take long: Karen advised it is easier to manage the angles by hand, especially with relatively small pieces, and had lots of tips for handpiecing which made it really straightforward and accurate.

I have since made twelve small blue stars which I will piece into the outer ring with brown triangles and then set the two rings together.  I also cut lots of diamonds for the diamond border and the outermost six-pointed star border and I glue basted some of the leftover scraps on to half inch hexagon papers.  These are pretty small but so cute!


I hand pieced the stars: Karen showed us how to spin/fan the seam allowances for flat centres and how to stitch so as to ensure there are no little holes in the middle where the diamonds meet.


So I am starting to get some of the elements together; maybe it is not such a daunting prospect after all?  Watch this space...

But I am also hoping (what an optimist!) to work on another Karen Styles quilt: Circle of Sisters:


This was the second class I attended and it complemented the first day perfectly as we worked on hand piecing six-pointed stars which of course form the outer border of the Robin's Nest quilt.

Here are closeups of some of Karen's fabulous blocks which I think are about 16" across:


The quilt is based on an original which Karen owns, and there is plenty of scope to play with the placement of fabrics to create different effects. 

Here is what I managed to do on the day:


I really enjoyed the handpiecing and have done some more in the past couple of days.  The surprise is, when you are all set up and have done the preparation (which admittedly isn't the most exciting part), the actual sewing isn't all that slow.  However there are 1600 pieces in this quilt, so it may still take a while...

I am also be inspired to make some smaller six pointed stars as Karen's little ones are so delicious, and the occasional use of fussy cutting makes them even more adorable:


and to try the 365 tiny blocks in the Star a Day quilt:


Also on my 'one day' list is the fabulous Mrs Billings quilt which Karen has assured me I CAN machine piece (apart from the hexagons):


So here is the amazing lady who has made all these quilts, and whose excellent teaching, pattern writing and the provision of precise templates have made the designs accessible to and possible for the rest of us.  Thank you, Karen, for a terrific two days of classes.


I won't be changing the name of this blog any time soon but I will be making time for some handpiecing as well.   Enjoy your sewing this weekend!