Pages

Friday, 10 November 2017

Show and Tell

At last, a chance to sit down and write a post.  Another month has passed and so much has happened.  I have been away twice, to Wales and to Scotland, and have spent the whole of the past week on admin when I would much rather have been sewing.

Still, I can show you lots of photos, even if not all my work.  My young students have been coming to me once a week for over a year and I am pleased to be able to show you their recent finished projects.

Here are Miriam's matched pair of cushions, her first commission; the brief was blue and white with some red, for a holiday cottage, and I think these fit the bill perfectly.


Since they each made their first full size quilt back in the early summer (see this post), the girls have been working on a variety of small blocks.  They chose the ones they liked best from the 3" blocks I have made for the 365 Challenge (which still isn't finished, alas - I have rather gone off the boil).

The idea was to grow their skills by making sampler blocks but without having to make another big quilt just yet.  So they started off just making a few of each sort of block from the ten or so designs they had chosen without any very clear idea of what they would do with the blocks.  


They had a chance to try different ways of colouring the same designs to achieve a completely different look, so it was a good way to learn how important value and contrast are in patchwork.  Because the blocks were small and relatively quick to make it stayed a fun project, and it was OK to abandon the ones which didn't work so well as not much fabric was 'wasted'.

As the weeks went by the question became, what do you want to do with all the cute little blocks?

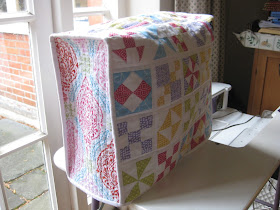
And here's the answer - Sophie made a cover for her sewing machine with her forty five blocks (displayed here on my machine, there is a row you cannot see very well along the top):


Sophie fussy cut and matched the end panels  and quilted them to increase stability.  She then finished the external seams with white binding to match the narrow sashing between the blocks.


Miriam made a capacious bag for all her sewing stuff with forty 3" blocks and chose a really jazzy fabric for the lining, sides and handles which pulls the colours in the blocks together:


I hope you agree, both projects are a great success and have developed their skills both in accurate block making and in construction of useful items.  I am really proud of them both and so enjoy their lively company on a Friday afternoon.  Next project?  Miles of rainbow bunting: stay tuned...

And now for some holiday snaps and my finish for Finish it up Friday with Crazy Mom Quilts.  
We had a week's holiday in Wales early in September, in a cottage in a quiet valley near Abergavenny.  


This was the owners' house, a traditional Welsh farmhouse dating back to the 16th century.  We stayed in The Old Stable next door: you can just see the wall in the corner of the photo.

It is not an area we have previously visited and we loved the hills and tranquillity, just what we needed at the time.  Apart from walking every day we just pottered around, and enjoyed the peace and quiet.  

I hand sewed the binding on this small quilt made from spare HSTs which had been kicking around for ages (mentioned in the second half of this post).


Simply quilted and hung on the door of The Old Stable, it's good to have a finish, however small.  Better than a bag of bits in the cupboard anyway.


Hope your weekend allows you time to work on what you enjoy.


Tuesday, 10 October 2017

Update

Well, what a month it has been.  The day after my last blogpost, a month ago today, my dear mum-in-law died peacefully and not unexpectedly, just three weeks short of her 90th birthday.  She had patiently endured poor health for over a decade, and had lived long and been much loved, but it is still sad that her always kind and encouraging presence has gone from our lives.

The past month has been as you might imagine, but we are now getting back on track and I even managed some sewing yesterday.  I still have a backlog of photos from the summer to share with you, so hope to start posting again regularly soon.  I was going to share some pictures today but I find that my dear husband, who has gone abroad for work this week, has taken the gadget I need to be able to transfer pics from my camera to the computer (yes, stone age technology still rules in our house).

So thank you for bearing with yet another period of silence and a few more days of 'visual silence'.  I hope to make it up to you later with a feast of photos!  Meanwhile I wish you joy in your quilting endeavours and happiness in your home life.
Alison

Saturday, 9 September 2017

September WIP roundup (Part 2) and a finish

Life getting in the way of good intentions, as usual. Here are glimpses of a couple of other quilt tops I have managed to get together over the past few weeks - I'm going to be doing lots of quilting soon!

First, a large top made with an old American Jane collection (sorry, can't remember which one) with some pin dots included.  The pattern,which I am calling Four patch Star (for my benefit: it's becoming harder to remember which quilt is which...), is from Carrie Nelson's book Schnibbles Times Two.  As usual I have fiddled with the design and made it bigger so it is rectangular rather than square.


I used fat quarters rather than the layer cakes the pattern is designed for, and I have also skipped the borders, and plan to quilt diagonal lines with the walking foot right to the edge.  The blocks are large, 16" square as each four patch measures 8" x 8".


Backing fabric is this fab red polka dot by Sevenberry - not what I originally intended but it spoke, nay, shouted at me as I rummaged through stash. I took a bit of care lining up the dots when joining the two lengths for the backing: not perfect but not too bad and worth the extra pinning!


I will try and get this one layered as soon as I can clear the dining room table of all my paperwork/start of the year admin. Even though I no longer have kids at school this always seems to me to be the start of the year after the change of pace over the summer; I wake up and try and achieve as much as possible before Christmas appears on the horizon and stuff has to be abandoned till January - my second chance to start the year!


Although they are not together yet I have made the large bonus triangles (cut off when making the flying geese units for the Four patch stars) into pinwheels.  I made a few extra pinwheels with a Charm pack of Bread'N'Butter, a more recent American Jane collection, so now I have 42 seven inch blocks.  I fancy setting them with spotty sashing as per this quilt by Red Pepper Quilts, but I need to go out and find the right spot, as I don't have enough of this Sevenberry spot.


The other quilt top which I am pleased to have got together as it has been lying around for even longer, is this one which I am calling Kaffe Fassett Nine patch on point; again, a descriptive rather than an inspired choice of name!


I have a large amount of KF fabric in my stash, acquired quite a few years ago, but part of me is too scared to use it.  I do like the fabrics still; I just feel I should be a bit cleverer or more arty in order to use them effectively....  I also have several KF books, though not the more recent ones.  Time I pushed myself out of my comfort zone in this regard too.  I don't have a backing fabric for this top yet so it may be a while before I show you more of it, but at least it has progressed to the next level.


Finally to my small finish: I managed the not very great task of layering and quilting the small quilt/table topper I showed you in the last post. And last night I stitched the binding down - I used 2" strips for a skinny doublefold binding as it seemed more in proportion to such a small quilt.  

The quilting is just in the ditch, concentric squares every other row: enough to anchor but not to distract from all the little pieces.  Backing and binding from stash.  Linking to Finish it up Friday with Crazy Mom Quilts.  Love the backpack she made.

Monday, 4 September 2017

September WIP roundup (Part 1)


Happy September to you all and back to school/college/university/work.  I am appalled to see that it is over a month since I blogged - where did August go? I have written lots of posts in my head but totally failed to get down to actually hammering the keyboard to share my sewing activities. Apologies and I promise to try harder this term!

So much has been happening recently that I think I will probably break the posts down in to smaller chunks for easier digestion.  Bear with me while we see how it goes. I think I will work backwards to give my memory a chance to recover!

I have been away a few times this month on sewing related treats so I have come back energised and inspired to tackle some new projects, but especially to finish and clear away some old ones; so this week just past has involved digging out a number of WIPs.

I still have the quilting to do but I have managed to get the following tops together:


In reverse order, this was last night's little treasure, a mini version of a quilt in Edyta Sitar's book Friendship Triangles (it still needs a final pressing). I had the trimmed off triangles from a large Thimbleberries quilt stitched together but screwed up in a bag.  After pressing they looked like this, 


and after trimming to 1 1/2" they looked like this. [Please excuse colour cast from camera flash as I took this photo at night].


I played around with the layout but had always been attracted to Edyta's design, Medallion Quilt which is made with 420 x 2" (finished size) half square triangles; her quilt has quite wide borders and measures 59" square.


My 'quilt' is made with what I had leftover which is 184 x 1" (finished) HSTs plus a few neutral triangles to fill in the gaps and make a straight edge. It measures 15" square.  I debated whether or not to add a border and have decided not to, so it is just waiting to be layered and quilted: hardly a massive job! 

My only other comments are that the trimming was well worth it in terms of getting all the points to match, and as well as my Bloc_loc ruler I gave thanks for my tank steam iron and Best Press spray which flattened out all the seams - so bulky in proportion to such small units. 

Here are the before and after photos for one of the quarter segments.


This next top is a little bigger, measuring 27 1/2" x 31 1/2" and was made from a bundle of offcut triangles and strips from a large quilt I made many years ago, which I am embarrassed to report is lying layered and machine basted upstairs, waiting to be handquilted.


I managed to trim the HSTs to 2 1/2" square and there were enough for thirty 4" (finished) blocks of 4 matching HSTs, set 5 blocks x 6, with 3" wide borders cut from the remaining 2 1/2" strips. I thought this block was called Birds in the Air or Flock of Birds but I haven't so far managed to confirm that: anyone out there know?


Backing and inner border/binding from stash plus a wadding offcut means a small 'free' quilt for someone out of a sad plastic bag of bits. My favourite kind of sewing as I feel thrifty and that I am tidying up at the same time as making a mess!


That's all for now. Hoping to post again tomorrow. Thank you to everyone who drops in to look at this blog from time to time - I met some of you at the Fabric Fayre in Great Bookham the Bank Holiday weekend and it was so good to catch up. Keep on quilting!

Saturday, 29 July 2017

Little and large: two triangle tops


Hi everyone! Summer here in the UK seems to have departed so I can't  get out into the garden, chilly rain reminiscent of November...

Despite a few nevertheless very enjoyable social engagements (including a graduation and a wedding) and the delivery of our new greenhouse to replace the ancient falling-down one, and much coming and going of family members, I have managed to fit in a little light sewing and finished putting together the two HST tops I mentioned in my last post.


So here they are: one made with large HSTs (trimmed to 9 1/2" square), the other made with 1 1/2" HSTs (finishing 1"), hence little and large, though neither top is especially big.


First, the Vast quilt, though not particularly vast, measuring 54" x 64" (please excuse creases, I forgot to iron in my rush to get a photo before it rained again).  The size is determined by the fact that I wanted to use the Layer Cake I already had (Dapper Wovens) and to see how big I could make the quilt with negligible waste.


I really liked the Vast quilt in Jeni Baker's book (here is another version Jeni made and blogged about earlier this year) which was also made by Anna Graham of Noodlehead (see her version here), and I was all fired up to make HSTs because of the talk I was giving on Terrific Triangles.  I got maximum yield from the Layer Cake - 42 layers 10" square yielded 42 HSTs 9 1/2" square.  You can see the scraps in the last blogpost when I had done the squaring up.


Obviously I didn't make the blocks quite as Vast as Jeni, who used fat quarters: her blocks finished at 17" square. But I am happy with my version for now.  Also Jeni had amazing long arm quilting on her quilt for the book, which I could never hope to emulate, but can certainly admire.


I am currently pondering over the quilting of my finished quilt top. I love Anna Graham's straight line
quilting but the Woven fabrics are very soft and I think they would distort if over quilted. I may just quilt in the ditch to start with and then possibly add some handquilting, with perle thread maybe? Any thoughts? I absolutely love the colours of the Wovens and this is a quilt I don't expect to part with so it would be worth adding some embellishment...

The other top is also inspired by a recent book I really like: it's a variation of the Remainders quilt in Amanda Jean Nyberg's book, No Scrap Left Behind, which I mentioned last post. 


My scraps were bonus HSTs left over from the flying geese units of a quilt I made with a starter bundle of Blend fabrics from the Eternal Maker in Chichester.  Completely out of my colour comfort zone but I was drawn to them and made this quilt which featured in a magazine and which has now gone to a new home.


The colours were so similar to the scraps Amanda Jean had used that I decided it was meant to be, though I modified the method and sashed the tiny HST units in the normal way, using just one plain fabric rather than scraps.

Having trimmed all the leftover HSTs to 1 1/2" which is where you left me two weeks ago, I counted up 288 HSTs and started to join them into strips with Kona Snow (from stash) plain fabric rectangles measuring 1 1/2" x 2". But part way through the process I felt that I didn't have enough HSTs for a reasonably sized quilt.  Funny how many there seemed to be when I had a never-ending pile to be trimmed, but they don't go far when laid out for a top (unlike Vast!).

Anyway I had a bit of fabric left from the original project and I pulled out a couple more aquas and yellows and neutrals to add variety.  Because I didn't want to have to do any more trimming, and because I had been demo-ing triangle papers, I decided to make the remaining HSTs using Thangles.


I had 1 1/2" firmly in my head from all the trimming - and so I made all my additional HSTs using 1 1/2" Thangle paper - making the cardinal error (despite re-reading the paperwork several times) of forgetting that 1 1/2" is the FINISHED size of the Thangle whereas I would be wanting my HSTs to measure 1 1/2" UNfinished....


So I stitched


and pressed


and removed papers


only to find I had a lovely pile of accurate 2" HSTs..... which I then had to trim down to 1 1/2" so they would match the others. Quilter's hubris. Did I mention there had been a lot going on?


Never mind, all's mostly well that ends well. And I had only made an extra 180 HSTs to be able to set 26 rows of 18 'blocks', sashed with strips which ended up 1 1/2" finished, just slightly larger than the 1" finished HSTs.


But while we are being honest, I have to confess also that in my eagerness to get this top together I did what I would tell my classes never to do: I did not measure and cut all my horizontal sashing strips to the same length, just as for borders, and did not pin but just whacked the strips on regardless. The result is that, although the top is reasonably flat, the lines of HSTs do not line up perfectly as vertical rows. It is not very easy to see in the photos but when you put a ruler over the top it is definitely out of true.

I did measure and add my outer 3" borders 'properly' so the quilt is a reliable rectangle measuring 52" x 70", but I can't straight line quilt it as the lines would be too obviously out. I definitely need to get practising free motion quilting so I can loopy quilt this one!


My only other gripe is that I find plain fabrics/solids fray far more than printed fabrics so I am going to have to spend quite a bit of time tidying up stray threads on the back before quilting. Any of you agree this is annoying?

But that's a small complaint really: I am delighted that that forlorn plastic bag of bits and leftover fabric from an old project have been made useful and given a purpose in this new quilt top.  So I am linking to Finish it up Friday with Crazy Mom Quilts, and my thanks once again to Amanda Jean for her continuing inspiration to those of us who, like her, love our scraps!