I am getting on quite well with handquilting my Lozenge EPP, despite not being the world's greatest handquilter. The problem is, I'd always rather be doing something else!
I love the look of handquilting - I don't think you can beat the soft, puckered finish it gives to any project, and it just oozes care and time (because, let's face it, that's what you have had to invest to get that great texture. That and sore fingers...).
However, there's no getting away from the fact that it takes time, time when I'd rather be cutting up fabric and chain piecing at speed on my sewing machine. And pressing: I do love pressing. But handquilting? Not so much. However, when I actually have no choice but to do it, because I am away from the machine, usually when watching younger son doing sport, I sort of sink into the slower tempo and surprise myself with how much it is possible to achieve. Little and often seems to be the key, whereas I am usually an all or nothing sort of person, preferring to blitz.
So I have nearly finished the lozenges and am planning the border quilting. The bad/sad news however is that when I unfolded the quilt yesterday morning I saw that there are fade lines on the backing.
I think it can only have happened on Tuesday and I must have left the bag too near a window as it was a beautiful day. Maddening how quickly something so permanent can happen... Be warned and keep your WIP's safe and out of direct light, even in England.
I am still going to finish the quilt. I may expose the whole back a little when it is done to see if I can lessen the contrast. If not, I will just have to pretend this is a vintage piece which has suffered during its long life... It does raise the question how much we take permanence for granted: do we really think about the durability of the quilts we make until something like this happens? I certainly don't. We expect our fabric to be made to a high standard and to last in that state, as long as we want it to.
And on the whole we are privileged to work with material made to a very high standard, so we forget that occasionally the colour might run or the dye fade in sunlight.
The backing I chose was from my stash and must have been purchased about 12 years ago as the shop where I bought it is no more. It is a soft brushed cotton, woven stripe. Whether that makes it more unstable I cannot say, but I will chalk this up to experience, and Carry on Quilting in the best British tradition.
I am linking to Freshly Pieced for WIP Wednesday as I wrote most of this post yesterday but forgot to upload my photos and actually publish last night!
Pages
▼
Thursday, 28 May 2015
Friday, 22 May 2015
Green reflections
Oh gosh, I can't believe where the time has gone these past two weeks: so much for my good intentions. I have hardly managed to do any sewing and the main reason is gardening.
It is that time of year again when, if you don't put in the hours when you can, the garden gets away from you and you can't get in between the plants to weed.
The time when you can almost see the plants growing, pumping sap into every cell, causing each leaf to expand in a glorious green explosion of life and growth.
Every morning I stroll round in the cool and quiet to check on progress and savour the different greens and the shapes/textures of the leaves. I love all the differing shades of green, and it made me wonder why I hardly ever sew with green; it's just not a colour I am drawn to for clothing, home decor or quilt making. And yet it is all around us, especially fresh and beautiful at this time of year; the most common colour apart from the blue of the sky (and sea if you live at the coast).
Why do we all have our favourites, do you think? I definitely veer towards cool blues and pink/purples rather than warm colours like orange and brown. Is that because of my own colouring, because those are the colours I prefer to wear?
You can see it in my choice of plants for the garden too - I have to force myself to throw in the occasional yellow or red as an accent. What colours do you like best and do you find this a recurring theme in other aspects of your life?
The other reason I am spending every spare moment in the garden is that in a couple of weeks' time we are opening to the public with several other gardens in aid of our village school which needs some funds to equip the new school hall. Although I have organised other Gardens Open events in the past I have never actually had visitors to our garden and I am starting to get nervous. I have to pretend not to be, however, and to keep encouraging the other kind owners who are also opening! Fingers crossed for a warm and sunny day, lots of visitors and a happy time - I will keep you posted.
I did manage to quilt this little flannel quilt (last mentioned here) one evening when I wasn't feeling too shattered. Just a small finish but good to get it off the UFO pile.
Plain navy fabric on the back, simple straight line quilting 1/4" from every seam, tan thread on the top and navy underneath - a bit risky, I know, but the tension was ok so I got away with it.
Here is my friend Alfie, come to see what is going on and whether a walk might not be out of the question.
Linking to Crazy Mom Quilts for Finish it up Friday. Hope you have a great weekend - Bank Holiday here in the UK. Guess what I'll be doing?
Friday, 8 May 2015
Pincushion tutorial
Enough looking at pretty pictures and dreaming about all the quilts I want to,but will probably never, make. Time for some actual sewing!
Here is a little pincushion which is small enough to be cute, but deep enough that your pins do not poke out the bottom and prick you when you pick it up. It measures 2 3/4" square and 1 1/2" deep, and is made from eight 2 1/2" squares: ideal for using mini charm squares or leftovers from other projects.
Just a word of disclaimer: this is not my pattern, it was passed on to me informally many years ago as is so often the way in our sewing communities. I have no idea if anyone has copyrighted it, it has been around a long time and I thought it was worth revisiting and sharing. If I can give credit I will, just let me know if you know its origins.
So here goes:
Make two four patch blocks from your eight 2 1/2" squares.
After pressing, cut out a 3/4" square from each of the corners of both blocks. I think it is safest to mark the cutting line with pencil and then use scissors rather than trying to rotary cut out such a small piece.
Fold the block right sides together and pin the corners: you will be stitching short seams on the edges you have just cut. Good idea to backstitch at each end.
Turn one of the blocks right side out and place this inside the other block, matching corners and seams.
This is important as it gives the pincushion a smart and professional finish if you get the intersections neat. I like to make my seam allowances go in opposite directions so they nest.
Pin and stitch all the way round but remember to leave an opening for turning in the middle of one side (not too near the corners though). Backstitch at each end of this seam as you don't want your stitching to come undone when you turn the piece inside out.
Turn right side out and stuff. I filled my pincushion with crushed walnut shells because I like the firm crunchiness when I stick in a pin (!) but you can use polyester toy stuffing if you'd rather. Slipstitch or ladder stitch the opening closed.
Thread a long needle with a strong thread, double it and knot the end. Sew a small button to the top and bottom in the centre of the pincushion, pulling on the thread so the buttons dimple in the middle. To finish off bring the needle out close beside one of the buttons and wrap the thread around the button before taking the needle through to the other side of the pincushion and cutting off the thread.
Or if you have used a decorative thread like a perle you might want to leave a long tail on the top of the pincushion when you go through the first button, and then bring the end thread back up after you have been back and forth a few times. You can then tie the two ends in a reef (square?) knot and make it a decorative statement.
The larger version (which was a gift to me a long time ago) is really chunky and great for long pins. It measures 6" square and is 2 1/2" deep. Make it with eight 4 1/4" squares or you can use a single fabric (in which case cut two 8" squares, one for the top and one for the bottom of the pincushion). The size of the corner cutout is a 1 1/2" square. Otherwise the instructions are exactly the same. The other variation on the big one is that it is wrapped with coton a broder like a parcel. Tie off the ends under one of the bottons if you want to do this.
I hope you have fun making a few of these pincushions - they make great gifts and look really sweet. I am off to make a few more. I am linking to Crazy Mom Quilts for Finish it up Friday - I love small quick projects for that finishing buzz!
Wednesday, 6 May 2015
Pour l'Amour du Fil Part 2
The name of the show translates as 'For the love of thread' and I'm sure we can all relate to that. Here are a few more photos of the great quilt show in Nantes which I visited on 26th April. I make no apology for showing you so many (though I have kept back quite a few even so) but do stay till the end to see the elephant....
First up are the amazing hand pieced quilts of Willyne Hammerstein which remind me of looking through a kaleidoscope as a child.
I believe that Willyne pieces over papers and hand stitches everything together. The fussy cutting gives wonderful variety and movement.
If you want to see more she has two books, Millefiori and Millefiori 2 which is new out.
I did not expect to like these quilts but they are absolutely stunning, the colours glow and I can only apologise that you don't really get a proper sense of their intricate beauty from my photos.
In complete contrast are the applique quilts of Irene Blanck from Australia. Also exquisite but a totally different colour palette, style and technique.
The quilts were beautifully displayed and I would love to be able to show you more - I am not great at applique but these quilts just make me want to have a go. I did buy Irene's book, Focus on Applique, so who knows, you may see my attempt on this blog in due course...
These next photos are more of what one thinks of as traditionally Japanese, made by Tomie Nagano from recycled antique kimonos.
I'm afraid the camera flash has bleached out the smoky dark depth of the indigo but the pictures will, I hope, give a suggestion of the grainy texture of the cloth. Again, these were large quilts made of lots of small pieces: the squares in the Double Irish Chain at the top were about 1 1/2" finished and I believe it was all hand pieced and hand quilted. The last quilt which is a sort of Rail Fence pattern must have been hand pieced as you will see that the pieces all interconnect - no quick tricks here!
And here are just a few photos of quilts I liked but cannot attribute:
And here is the elephant, as promised: if you want to see him walk, this is the link to the video and you will be able to find out more at this site.
To finish, an amazing weekend. Thank you for letting me share what were for me the highlights. There was so much more but I think you will have to go yourself one day.
My WIP this week is a New York Beauty which I started back in 2005 in a weekend workshop with Valori Wells. Inspired by the sight of so many wonderful NYB's at the Nantes show I have dug mine out and will show you more in coming weeks (once I have mastered curved seams!).
Linking to Lee at Freshly Pieced for WIP Wednesday: always love her WIP's.
First up are the amazing hand pieced quilts of Willyne Hammerstein which remind me of looking through a kaleidoscope as a child.
I believe that Willyne pieces over papers and hand stitches everything together. The fussy cutting gives wonderful variety and movement.
If you want to see more she has two books, Millefiori and Millefiori 2 which is new out.
I did not expect to like these quilts but they are absolutely stunning, the colours glow and I can only apologise that you don't really get a proper sense of their intricate beauty from my photos.
In complete contrast are the applique quilts of Irene Blanck from Australia. Also exquisite but a totally different colour palette, style and technique.
The quilts were beautifully displayed and I would love to be able to show you more - I am not great at applique but these quilts just make me want to have a go. I did buy Irene's book, Focus on Applique, so who knows, you may see my attempt on this blog in due course...
Two Japanese quilters next: Fumiko Nakayama makes extravagantly coloured quilts using the Mola techniques of applique and reverse applique. The designs are exuberant and not at all what one expects when one thinks of Japanese quilting, but there is the same meticulous stitching and attention to detail that seems to characterise Japanese work at the highest level. These photos cannot really show the way the fabrics are layered and cut back and stitched with absolutely invisible stitches to give just the right colour in just the right place. Extraordinary. And some of the pieces were huge!
These next photos are more of what one thinks of as traditionally Japanese, made by Tomie Nagano from recycled antique kimonos.
I'm afraid the camera flash has bleached out the smoky dark depth of the indigo but the pictures will, I hope, give a suggestion of the grainy texture of the cloth. Again, these were large quilts made of lots of small pieces: the squares in the Double Irish Chain at the top were about 1 1/2" finished and I believe it was all hand pieced and hand quilted. The last quilt which is a sort of Rail Fence pattern must have been hand pieced as you will see that the pieces all interconnect - no quick tricks here!
And here are just a few photos of quilts I liked but cannot attribute:
And some boutis, because it was France after all! Such beautiful work, though not something I am ever likely to attempt.
My WIP this week is a New York Beauty which I started back in 2005 in a weekend workshop with Valori Wells. Inspired by the sight of so many wonderful NYB's at the Nantes show I have dug mine out and will show you more in coming weeks (once I have mastered curved seams!).
Linking to Lee at Freshly Pieced for WIP Wednesday: always love her WIP's.
Friday, 1 May 2015
French quilt show photos
Well, I'm back and just about sorted out the semi-chaos at home, so I can share some photos of my amazing trip to Nantes in France this weekend past.
I went with my friends Julia and Gwen and the purpose of the visit was to attend the quilt show Pour l'Amour du Fil organised by Quiltmania, the French patchwork and quilting magazine. Having seen the photos of previous shows in Quiltmania over a number of years it was wonderful actually to be there, and the show did not disappoint.
We managed to negotiate the tram system (very easy once we worked out where we were going...) and travelled to the Parc des Expositions at Beaujoire at the very end of the line. The exhibition hall was spacious and calm with gardens and river nearby, and the stalls were beautifully decorated with quilts and merchandise, a feast for the eyes. There was an emphasis on quality, of the goods on sale and the workmanship of the samples on display. Despite our faltering French everyone was very kind and helpful (and many spoke very good English).
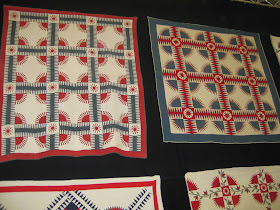
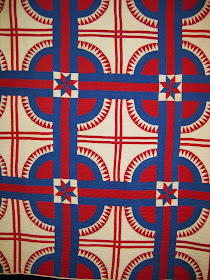
We had particularly wanted to visit the show because of an exhibition of nearly 60 vintage New York Beauty quilts from the collection of Bill Volckening. The quilts were absolutely stunning and beautifully displayed in two tiers along the main wall. These are not small quilts and it was wonderful to have the space to stand and view them at a distance, as well as to get up really close and examine the stitches .
The quilts are mostly made in plain fabrics (solids) and look so modern, with a limited number of colours used in each quilt, high contrast and strong graphic design. Lots of negative space to show off wonderful hand quilting. Seeing so many of the same pattern in one place really showed up the variations in sashing and layout: then as now we quilters like to tweak a pattern to make it truly our own!
I apologise for the fact that my small camera insisted on using flash so the colours aren't quite perfect, but they are better than I expected. And if you are keen to see more, Bill has a book out published by Quiltmania which will tell you all you have ever wanted to know about this quilt pattern.
I couldn't choose a favourite so here are a selection, all hand pieced and hand quilted, without the benefit of foundation (paper) piecing and rotary cutting, many are more than 100 years' old. I would be proud to have made any of them.
There was so much more to see and I have taken so many more photos that I will post separately over the next few days.
I am slightly embarrassed to show photos of my own work having seen such wonderful sewing by others, both named and unknown masters of their craft, but I did make up a little purse kit I purchased from a stall selling Japanese fabric. I wasn't mad keen on the applique flower to go in the centre so when I got home I dug out a spare square-in-square from my Quartet BOM: with the addition of narrow borders it fitted perfectly.
So I can link to Crazy Mom Quilts for Finish it up Friday, and to Lily's Quilts for Fresh Sewing Day: my favourite project from April was the Disappearing Hourglass, it was such fun to do. I know it still needs to be quilted, but I'm planning a shopping trip for the backing very soon...
Here's to a productive, and merry, month of May for us all.